Identify malicious traffic through predefined rules. A collection of policies and rules is known as a managed rule set.
Prevent false positives by:
Defining cookies, request headers, and query string arguments that should be ignored when performing a threat assessment. This type of configuration is known as an ignore list.
Identifying requests for which specific predefined rules will not be applied. This type of configuration is known as a rule exception.
The characteristics of certain cookies, headers, and query string arguments may resemble malicious traffic. This may result in Edgio incorrectly identifying a request as a threat. Avoid this situation by identifying the cookies, headers, and query string arguments that should be ignored when Edgio performs threat assessment.
Key information:
An ignore list does not behave like a whitelist, accesslist, or blacklist. Rather, it simply allows the system to ignore specific cookies, headers, and query string arguments when assessing whether a request violates a managed rule set.
Specify each unique cookie, header, or query string argument by typing it and then pressing ENTER.
Each specified value is interpreted as a regular expression.
By default, a regular expression defines a case-sensitive match. Use syntax (e.g., [a-zA-Z]) to make it case-insensitive.
A maximum of 100 entries may be defined within a single ignore list.
Standard security practices dictate that measures should be taken to prevent sensitive data (e.g., credit card information or passwords) from being passed as clear text from the client to your origin server. If this type of data is left unencrypted, then it will be logged by our system when an alert is triggered as a result of this data. If sensitive data cannot be encrypted or obfuscated, then you should disable logging for the desired matched on variable.
To disable variable logging
Navigate to the Managed Rules page.
From the Edgio Console, select the desired organization.
From the Security section, click Managed Rules.
Click on the desired managed rule.
From the Settings tab, click + Add New Redacted Variable.
From the Match On option, type either the exact name or a regular expression for the matched on variable that will be redacted. Use a regular expression if you would like to match against multiple variables.
Optional. From the Replacement Name option, assign a new name to the variable(s) identified in the previous step.
From the Replacement Value option, type the value that will be logged for the variable(s) identified in the previous step.
Define query string arguments limitations for valid requests.
Care should be taken when modifying these advanced settings.
Query string value / parameters: A variety of restrictions may be placed on either a request’s query string value or parameters.
The Total Argument Length option defines the maximum number of characters for the query string value in the request URL.
The Max # of Arguments/Request option defines the maximum number of parameters that a query string may contain.
The Single Argument Length option defines the maximum number of characters for any single query string parameter value in the request URL.
The Argument Name Length option defines the maximum number of characters for any single query string parameter name in the request URL.
JSON Inspection: Determines whether JSON payloads will be inspected.
Any single violation of the above limits adds 5 points to a request’s anomaly score.
For example, our service adds 10 points to a request’s anomaly score if it exceeds both the query string length limit and the limit for the number of query string arguments.
The ERS, which is primarily based off of OWASP CRS 4.x rules, identifies malicious traffic and provides generic protection against a variety of unknown vulnerabilities. This rule set does not solely rely on signatures to check for known vulnerabilities. Rather, it analyzes all HTTP data for malicious payloads.
In addition to defining a threshold, this rule set allows you to balance protection against false positives through the Paranoia Level option. Paranoia levels are explained below.
1: Recommended. Choose this level to keep the number of false positives to a minimum.
2: Choose this level to provide a slightly higher level of protection to your web applications.
3: Choose this level to provide more protection with a higher rate of false positives.
4: Choose this level to provide the most amount of protection. This level may cause a much higher rate of false positives.
Before leveraging a new rule set to secure production traffic, it is strongly recommended to fine-tune its configuration to account for your traffic profile.
Automatically verify that your web applications are compatible with our latest threat detection policies by enabling the Automatically opt-in to the latest ERS ruleset option. This mode is only recommended for auditing new rule sets. You should set your Security Application configuration’s Audit Managed Rule option to a managed rule that has opted-in to automatic updates to the latest rule set. This type of setup provides you with the opportunity to minimize false positives before enforcing our latest threat detection policies on your production traffic.
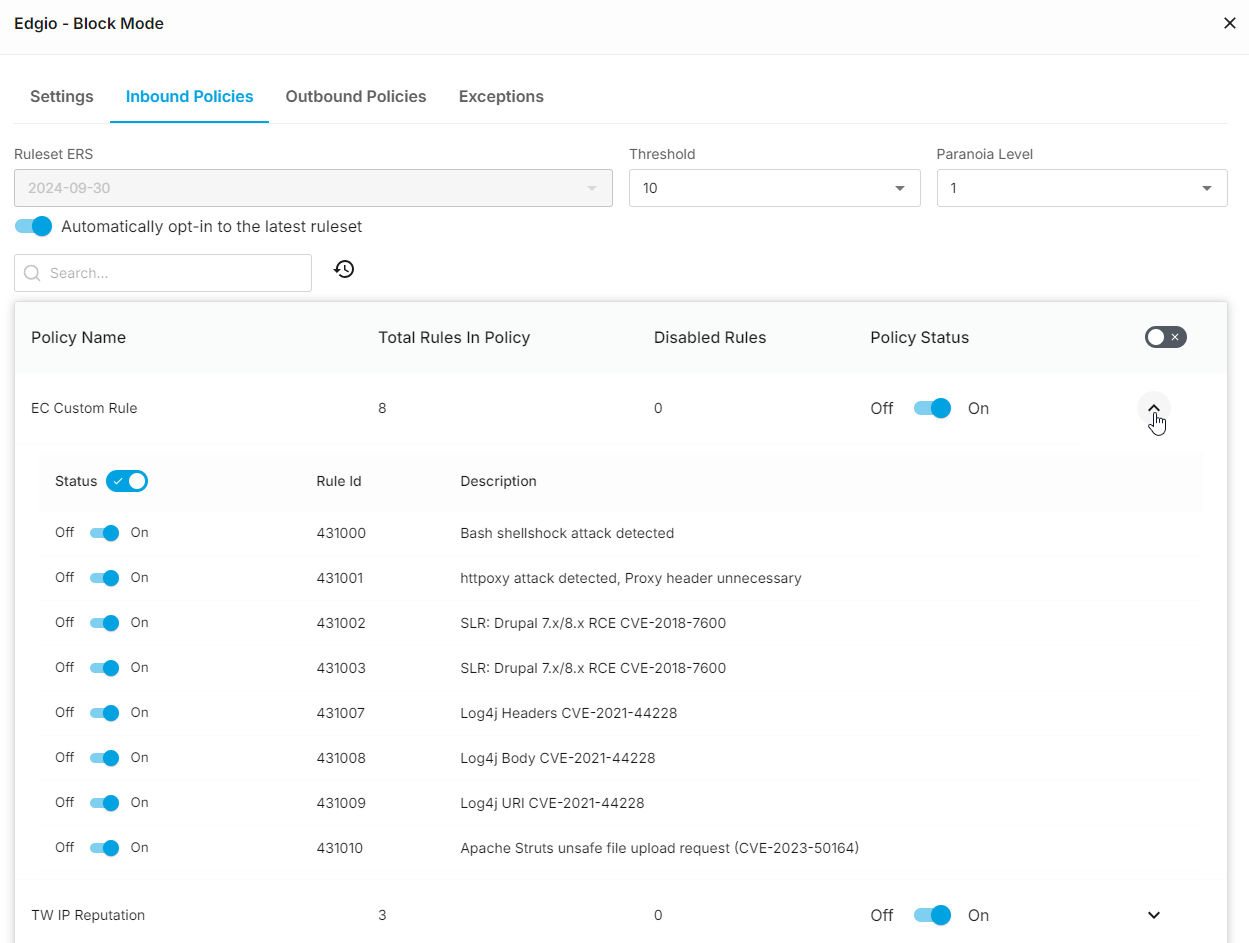
The ERS rule set consists of a set of threat detection policies. Each threat detection policy contains a set of rules that define how threats to site traffic will be detected.
Key information:
Only a single rule set may be associated with a managed rule.
A threat detection policy or its rules may be disabled.
View a policy’s rules by clicking on the icon from the far right column.
The Disabled Rules column indicates the number of rules that have been disabled for that policy.
Take care when disabling a policy or an individual rule since it can potentially increase the vulnerability of site traffic.
Changing the rule set associated with a managed rule will overwrite the existing rule set configuration.
The purpose of a rule set is to protect your origin servers. As a result, managed rules are only applied to requests that will be served from your web servers. Edgio does not use them to screen requests for cached content served directly from the edge of our network.
A Security Application configuration determines the enforcement action that will take place when a request is identified as a threat as a result of a managed rule.
Periodic updates to the policies and rules in a rule set are necessary to address the dynamic nature of threats to site traffic. Due to this changing landscape of threats, it is critical to keep up with the latest rule set updates. Using the latest rule set version maximizes the degree to which HTTP/HTTPS traffic is protected.
Identify a rule set’s version by the date on which it was released.
Syntax:
<Rule Set Name> <Date>
Example:
ERS 2024-09-30
To apply an updated rule set to production traffic (recommended)
Create a managed rule that points to the updated rule set.
Modify the desired Security Application configuration’s Audit Managed Rule option to the above managed rule.
Wait a reasonable amount of time (e.g., 24 to 48 hours) to screen traffic. After which, review the Threats tab of the Security dashboard for false positives.
If many false positives are found, identify the policies and rules that are causing them and then disable them from the managed rule created in step 1. After which, repeat step 3.
If few false positives are found, set the Security Application configuration’s managed rule to the one created in step 1.
A brief description for each available threat detection policy is provided below.
The set of available policies varies according to the selected rule set.
Balance security with optimal data delivery performance by disabling policies that do not apply to your site’s traffic. For example, the Typo3 attacks policy should be disabled if your site does not use that CMS.
The EC Custom Rule policy and polices that start with “Adv” run in signature mode, while all other policies run in anomaly mode. Signature mode means that a single violation will result in a request being categorized as a threat. Anomaly mode means that a threshold must be met before a request will be considered a threat.
Inbound policies:
Adv Apache Apps: Detects attacks that target Apache applications.
Adv CPanel: Detects attacks that target sites that leverage cPanel.
Adv Drupal: Detects attacks that target Drupal CMS installations.
Adv IIS: Detects attacks that target Microsoft IIS servers.
An effective strategy for reducing false positives (i.e., a legitimate request that was identified as a threat) is to create rule exceptions. A rule exception identifies one or more rules that will be ignored for a set of requests. Identify requests using any of the following criteria:
Argument Name: Identifies all requests with a query string parameter or body parameter whose name matches the specified value.
Argument Value: Identifies all requests with a query string parameter or body parameter with the specified value.
Cookies: Identifies all requests with a cookie whose name matches the specified value.
Header: Identifies all requests with a request header whose name matches the specified value.
Another strategy for reducing false positives is to reduce the Paranoia Level option. The recommended level is 1.
Tips for setting up rule exceptions:
Use regular expressions to create a pattern through which requests will be identified. Mark the Regex? option to specify a regular expression instead of a literal value.
The best strategy for defining exceptions is to:
Identify false positives within the Threats tab of the Security dashboard by reviewing recent threats and identifying requests that were made by actual users.
Identify a common attribute within those requests and the rule(s) that they inadvertently triggered.
Administer managed rules from the Manage Rules page.
Apply a managed rule to production traffic by adding it to a Security Application configuration and then determining how it will be enforced. Multiple Security Application configurations may use the same managed rule. Leverage this capability to tailor security screening by application or traffic profile.
It may take up to 2 minutes for an updated managed rule to be applied across our entire network.
To create a managed rule
Navigate to the Managed Rules page.
From the Edgio Console, select the desired organization.
From the Security section, click Managed Rules.
Click + New Managed Ruleset.
Optional. Allow Edgio to autotune your managed rule using machine-learning models by toggling the Autotune option. Autotuning is only meant to be used for managed rules running in audit mode.
In the Name option, type the unique name by which this managed rule will be identified. This name should be sufficiently descriptive to identify it when setting up a Security Application configuration.
Optional. In the Response Header Name option, set the name of the response header that will be included with blocked requests. This name may only consist of alphanumeric characters and dashes.
Add a cookie, request header, or query string argument that should be ignored by typing it within the Ignore Cookies, Ignore Header, or the Ignore Query Arguments option and then pressing ENTER.
Repeat the above step for each cookie, request header, or query string argument that Edgio should ignore.
Advanced Users Only
Customize query string limits by expanding More Details and then making the necessary adjustments.
Enable the desired threat detection rules and define the threat identification threshold.
Click the Inbound Policies tab. By default, this managed rule will use the latest rule set.
Optional. Assign a rule set by disabling the Automatically opt-in to the latest ruleset option and then selecting the desired rule set from the Ruleset ERS option. The list of policies shown below this section will be automatically refreshed to reflect the selected rule set.
Automatically verify that your web applications are compatible with our latest threat detection policies by enabling the Automatically opt-in to the latest ruleset option. This mode is only recommended for auditing new rule sets. You should set your Security Application configuration’s Audit Managed Rule option to a managed rule that has opted-in to automatic updates to the latest rule set. This type of setup provides you with the opportunity to minimize false positives before enforcing our latest threat detection policies on your production traffic.
The Threshold option does not apply to the EC Custom Rule policy or policies that start with Adv. Those policies run in signature mode, which means that a single violation will cause a request to be flagged as a threat.
Set the Paranoia Level option to a level (e.g., 1) that balances security with risk tolerance.
This is an advanced setting. The recommended paranoia level is 1. Setting this option to a higher value will increase the number of false positives.
Review all enabled policies and rules to ensure that the legitimate traffic is not targeted by mistake.
Security Premier only. Optional. Prevent data leakage in the response sent to the client by clicking the Outbound Policies tab and then enabling the desired outbound rules.
Optional. Define the type of requests for which specific rules will be ignored.
Click the Exceptions tab.
Click + Add New Condition.
From the Parameter option, select whether requests will be identified by argument (i.e., query string argument or request body parameter), cookie, or request header.
From the Argument | Cookie | Header Name option, type one of the following values:
The exact name of the query string argument / request body parameter, cookie, or request header by which requests will be identified.
A regular expression pattern for the query string argument / request body parameter, cookie, or request header by which requests will be identified. Mark the Regex? option to indicate that the specified value should be interpreted as a regular expression.
In the Applied Rule ID’s option, type the ID for a rule that will be ignored when processing the requests
identified in steps 9.iii and 9.iv and then press ENTER. Repeat this step as needed.
Click Save.
If sensitive data is passed as clear text and cannot be encrypted, then you should redact the matched on variables that may potentially match on it.
To modify a managed rule
A common reason for updating a managed rule is to reduce false positives by adding a rule exception. A rule exception identifies one or more rules that should be ignored for a specific set of requests. Typically, the criteria for a rule exception are identified through analysis within the Threats tab of the Security dashboard.
Navigate to the Managed Rules page.
From the Edgio Console, select the desired organization.
From the Security section, click Managed Rules.
Click on the desired managed rule.
Make the desired changes.
Click Save.
To delete a managed rule
You cannot delete a managed rule that is associated with a Security Application configuration. Please either modify the Security Application configuration to point to a different managed rule or delete that Security Application configuration.
Check your Security Application configurations to verify that the desired managed rule is not in use.
Navigate to the Managed Rules page.
From the Edgio Console, select the desired organization.
Compare a previous version of a configuration to the current version.
Edgio Security Premier and Business support a rolling window of up to 200 versions, while Edgio Security Essentials and Insights is restricted to a rolling window of up to 100 versions.
An advantage of using version control is that it allows you to quickly roll back to a previously vetted configuration. For example, if you notice that a new configuration has resulted in more false positives, then you can roll back to the previous version before analyzing the data.
To view, compare, and reactivate a previous configuration
Load the desired security configuration (e.g., access rule, rate rule, or custom rule).
Click Versions.
Click on the desired version to view it.
Optional. Compare the version selected in the previous step to the current version by clicking Diff. Differences between those two versions are highlighted in green (new or updated lines) and red (modified or deleted lines).
Optional. Reactivate the version selected in step 3 by clicking Reactivate. Click Reactivate this version to confirm that it will be reactivated.


 The Disabled Rules column indicates the number of rules that have been disabled for that policy.


