You may use Experimentation to send traffic to another environment either within the same or a different property.
One use for this capability is to migrate iteratively from a legacy to a new site. Validate a new feature by sending some production traffic to an environment where that new feature is hosted.
How Does Proxying Traffic Work?
Edgio processes all requests using our standard order of operations. However, traffic that is sent to another environment will be processed by the rules for both environments as indicated below.
- Entry Environment: Edgio will apply the entry environment’s rules to the request.
- Destination Environment: Edgio will then apply the destination environment’s rules to the request. These features take precedence over the ones defined within the entry environment’s rules.
In addition to rule processing, you may choose to add custom logic to your origin server that alters the behavior based off of the host requested by the client. This type of setup requires logging the Host header within the entry environment.
Setup
The two basic methods for routing traffic to multiple environments are:
-
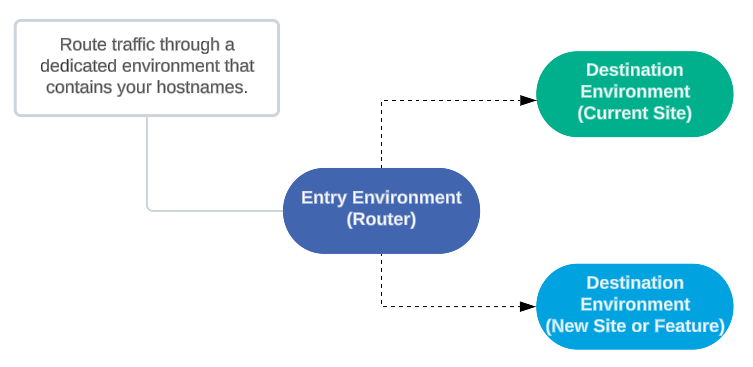
Dedicated Routing Environment: Recommended. Use the environment that contains your hostnames to route traffic. The rules defined within this environment should be applicable to all traffic. Set up an experiment on this environment to route traffic to multiple environments.For example, you can route traffic to an environment that contains the configuration for your current site and another environment that contains your new site.
-
Shared Environment: Set up an experiment on the environment that contains your hostnames and your site’s configuration to route traffic to another environment.Traffic will be routed to another environment after it has been processed by the entry environment’s rules. If this behavior impacts the results of your experiment, then you should use a dedicated routing environment that only contains rules that are applicable for all traffic.If you are using Edgio Sites, Edge Functions, or Cloud Functions, then you may only use a dedicated routing environment instead of a shared environment. Using a shared environment with these capabilities may result in
404 Not Foundresponses.For example, you can route traffic to another environment for the purpose of A/B testing a new feature.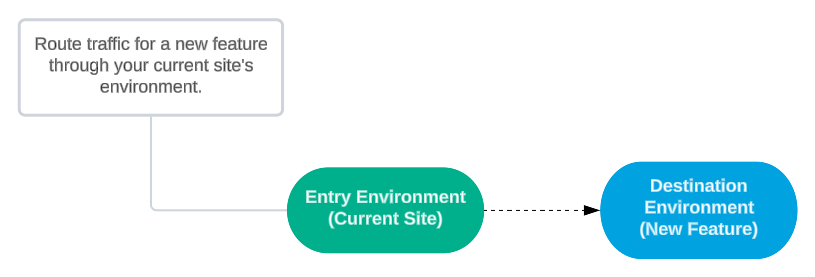
If are you using Edgio Sites, Edge Functions, or Cloud Functions and you are proxying traffic to a different environment within the same property, then you may incur additional latency. A workaround for this issue is to proxy traffic between the production environments of two different properties.
Edgio Sites, Edge Functions, and Cloud Functions may run in a different region for the production environment than other environments. If you are sending traffic between these environments, then latency is introduced due to traffic being routed between two regions.
Destination Environment Setup
Before setting up an experiment, you will need to set up each environment to which traffic will be routed. These environments are known as your destination environments. Once you have created the desired environments, define origin configurations, rules, or both.
-
Edgio Console: The quickest way to replicate rules and origin configuration(s) is by marking the Copy settings from environment option when creating an environment. After which, you may adjust your rules and origin configuration(s) as needed.
-
Edgio CLI: Deploy your production configuration through the
--environmentoption.Bash1edgio deploy --environment my-new-environment
The recommended setup is to create an environment for each version of your site. This setup ensures that the rules for your current site do not affect the new site’s behavior.
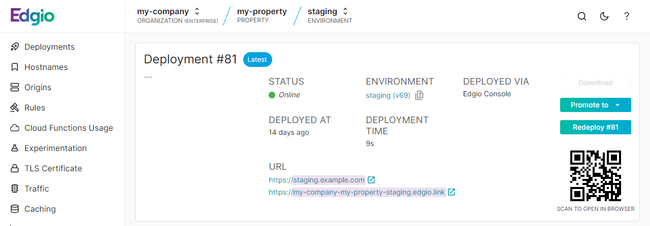
After which, you should note the domain associated with each deployment’s edge link. Sample domains are highlighted below.
Entry Environment Setup
Entry environment setup consists of performing the following steps:
- Create an origin configuration each for each destination environment.
- Optional. Log the
Hostheader to identify traffic routed through the entry environment. - Set up an experiment with variants that route traffic to the desired destination environment(s).
Origin Configuration
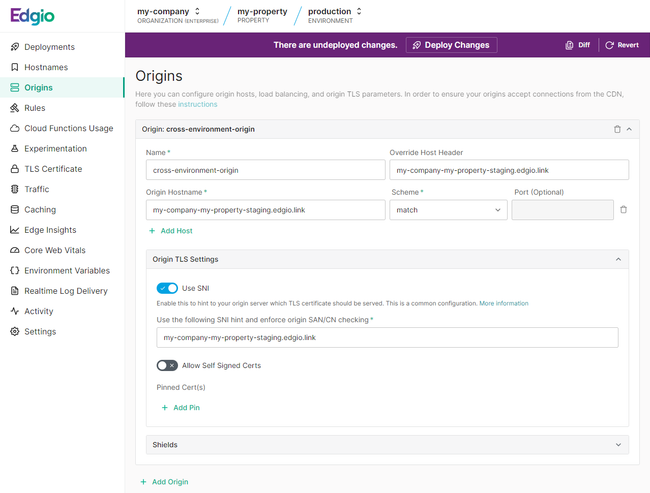
Create an origin configuration within the entry environment.
-
Set the Origin Hostname and Override Host Header options to a destination environment’s domain.If the destination environment’s domain contains
.glb, then you should remove it.For example, you should updatemy-org-my-property-production.glb.edgio.linktomy-org-my-property-production.edgio.link. -
Verify that the Use the following SNI hint and enforce origin SAN/CN checking option was autopopulated with the same domain.
Your origin configuration should look similar to the following illustration:
Host Header Logging
If you plan on setting up custom logic for traffic routed from the entry environment, then you should create a rule that sets the host requested by the client (
%{http_host}) within the x-forwarded-host request header.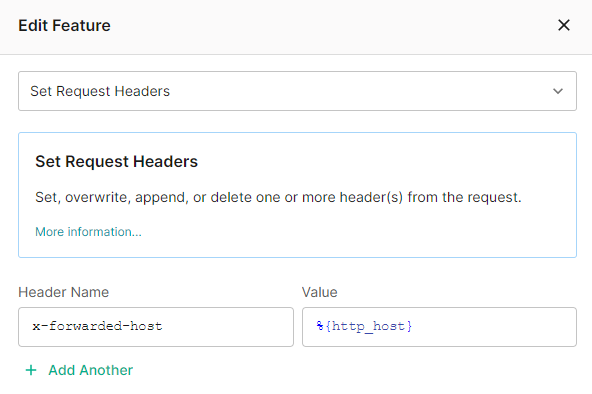
After which, you should define custom logic within your code to handle requests that originate from the entry environment.
Experimentation Setup
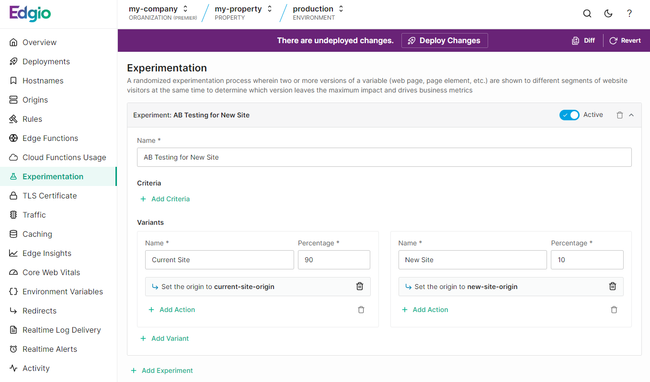
Create an experiment within the entry environment. Configure each desired variant to point to an origin configuration that points to the desired environment.
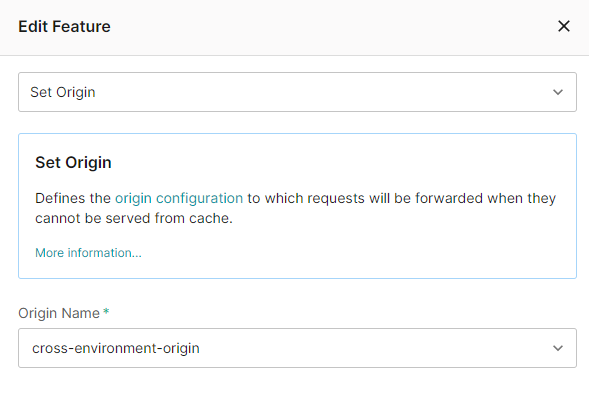
Your experiment should look similar to the following illustration:
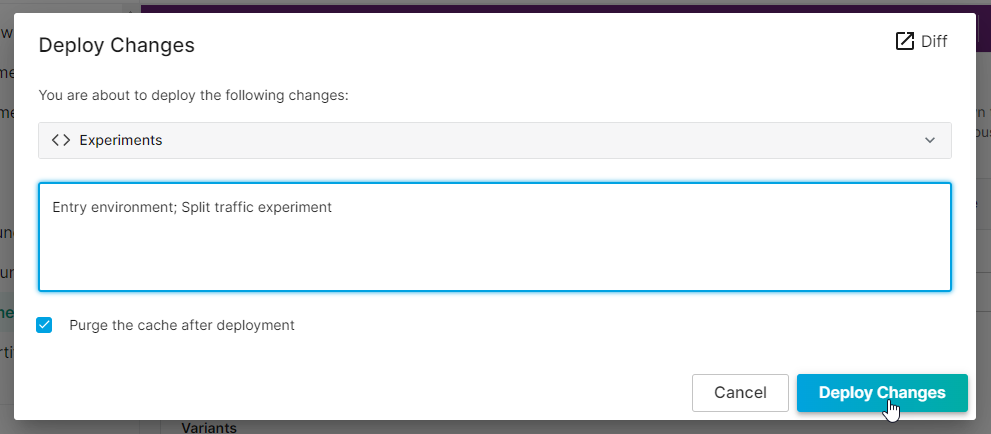
Deploy your changes to the entry environment. We recommend adding a note indicating the start of this experiment.
The variant assigned to a client persists until cookies are cleared. This means that testing this experiment may require clearing your cookies various times or initiating various distinct private browsing sessions.
Experiment Conclusion
Conclude an experiment by either promoting the new feature or website or reverting to the current website. Perform one of the following procedures:
-
Continue to route traffic through the entry environment by shifting 100% of the traffic to the desired environment.Routing all traffic through the entry environment reduces the level of effort required to conclude or start a new experiment.
-
Serve the new website from the entry environment.
- Transition production traffic to the new website by applying the new website’s environment configuration to the entry environment.
- Disabling or deleting the experiment.
- Deploying your changes.
-
Serve the current website from the entry environment.
-
Transition production traffic to the legacy website by rolling back your configuration to the state prior to this experiment.
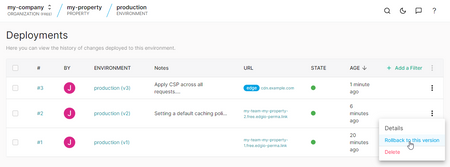 If you have made changes to your configuration since the start of this experiment, then you should manually deploy the desired destination environment’s configuration to the entry environment.
 -
Deploying your changes.
-
To manually deploy a configuration from another environment
Use this procedure to apply a destination environment’s configuration to the entry environment. However, if you have modified your configuration since the start of the experiment, you should manually deploy the destination environment’s configuration to the entry environment.
Edgio Console: If you use the Edgio Console to deploy, perform the following steps:
-
Recreate the destination environment’s origin configuration within the entry environment.The recommended method for recreating origin configurations is described below.
-
From the destination environment, navigate to the Origins page.
-
Click JSON Editor.
-
Copy all of your origin configurations by selecting all of the text and then pressing
CTRL+C. -
Navigate to the entry environment’s Origins page. It should already display the JSON editor.
-
Perform either of the following steps:
-
Replace the entry environment’s origin configurations by selecting all of the text and the pressing
CTRL+V. -
If you need to keep one or more origin configurations, then you should paste the destination environment’s origin configurations at the end of the configuration.After which, find the point at which you pasted your configuration. It should look similar to this:1...2 }3][4 {5...Replace those brackets with a comma as shown below.1...2 },3 {4...
-
-
Click Origins Editor. Verify that destination environment’s origin configurations were successfully moved over.
-
-
Recreate the destination environment’s rules within the entry environment.The recommended method for recreating rules is described below.
- From the destination environment, navigate to the Rules page.
- Click JSON Editor.
- Copy all of your rules by selecting all of the text and then pressing
CTRL+C. - Navigate to the entry environment’s Rules page. It should already display the JSON editor.
- Replace the entry environment’s rules by selecting all of the text and the pressing
CTRL+V. - Click Rules Editor. Verify that destination environment’s rules were successfully moved over.
-
Deploy your changes by clicking Deploy Changes.
CDN-as-Code: If you use the Edgio CLI to deploy, perform the following steps:
-
Review the origin configurations defined witin the edgio.config.js. Revise as needed.By default, the origin configurations defined at the root of the edgio.config.js are applied to the environment being deployed. You may override a specific origin configuration by defining it within the environments key.
-
Review and revise your
routes.[js|ts]file for code that is specific to your destination environment or the test being performed. -
Deploy your updated configuration to the entry environment.
edgio deploy --environment=<ENTRY_ENVIRONMENT>