Learn how to set up a basic security policy through which you can secure your web applications against malicious and unwanted traffic.
Prerequisites
Edgio can only secure traffic that it serves. Before defining a security policy, you should first:
- Identify or create an organization.
- Set up content delivery through a property that belongs to the organization identified in the previous step.
Edgio allows all organizations to set up basic security through Security Insights. However, we also offer more comprehensive solutions. Contact your account manager or our sales department at 1 (866) 200 - 5463 to upgrade your account.
Setup Overview
Setting up security requires creating rules that determine how your traffic will be secured, identifying the set of traffic that will be secured, and then monitoring flagged traffic to verify or fine-tune your security configuration.
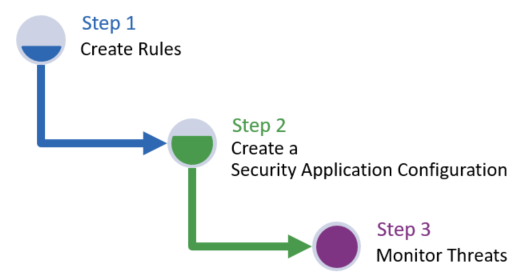
Step 1: Create Rules
Step-by-step instructions on how to create a basic access rule, rate rule, and managed rule are provided below.
Create an Access Rule
Create an access rule that identifies traffic that should be allowed, denied, or screened through whitelists, accesslists, and blacklists.
-
Navigate to the Access Rules page.
- From the Edgio Console, select the desired organization.
- From the Security section, click Access Rules.
-
Click + New Access Ruleset.
-
In the Name of Rule option, type
My Access Rule. -
From the Add an Access Control option, select IP.
-
Click + blacklist.
-
From within this blacklist section, add an IP address from which suspicious traffic originates by typing it and then pressing
ENTER. Repeat this step as needed.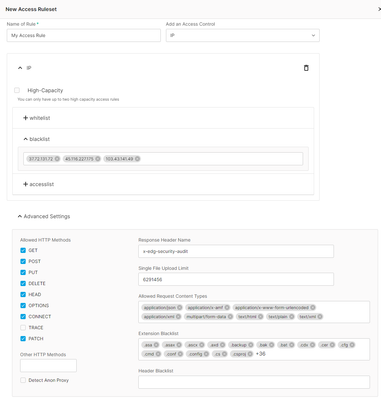
-
Click Save.
Create a Rate Rule
Create a rate rule that restricts the flow of traffic from a client to your application to 100 requests per minute.
-
Navigate to the Rate Rules page.
- From the Edgio Console, select the desired organization.
- From the Security section, click Rate Rules.
-
Click + New Rate Ruleset.
-
In the Name option, type
My Rate Rule. -
In the Rate Limit option, type
100. -
From the Time period option, select 1 minute.
-
From the Apply rate limit to option, select IP address.
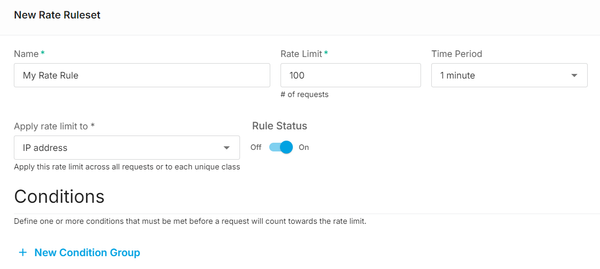
-
Verify that the Rule Status option is set to On.
-
Click Save.
Certain services and applications, such as VPNs, mask a client’s IP address. Specifically, they will report an IP address of their choosing instead of the client’s real IP address. As a result, multiple devices and perhaps even users may end up sharing the same IP address.
Create a Managed Rule
Create a managed rule that leverages predefined rules to detect application layer attacks.
-
Navigate to the Managed Rules page.
- From the Edgio Console, select the desired organization.
- From the Security section, click Managed Rules.
-
Click + New Managed Ruleset.
-
In the Name option, type
My Managed Rule. -
Click the Inbound Policies tab.
-
Set the Threshold option to 5.
-
Verify that the Paranoia Level option is set to 1.
-
From the Policies section, disable policies that do not apply to your application.For example, you may safely disable Adv Drupal, Adv SharePoint, and Adv WordPress if your application does not leverage those platforms.
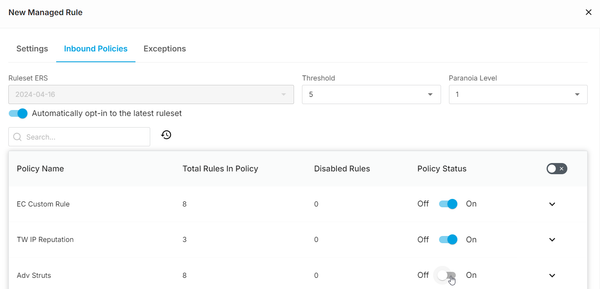
-
Click Save.
Step 2: Create a Security Application
A Security Application configuration defines the set of traffic that will be inspected and defines the security policy that will be applied to it. Instructions on how to create a Security Application configuration for all of your site’s traffic is provided below.
-
Navigate to the Security Application Manager page.
- From the Edgio Console, select the desired organization.
- From the Security section, click Application Manager.
-
Click + Create New.
-
In the Security Application Name option, type
My Security Appand then click Continue. -
From the Select the rules you would like to add or create section, click Access Rule.
-
From the Production Access Rule option, select My Access Rule.
-
From the Production action option, select Alert only.
-
From the Rules section, click Rate Rules.
-
From the Add Rate Rule option, select My Rate Rule.
-
From the Action option, select Drop.
-
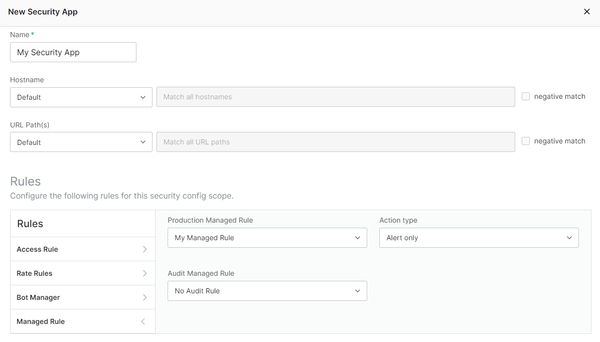
From the Rules section, click Managed Rule.
-
From the Production Managed Rule option, select My Managed Rule.
-
From the Production action option, select Alert only.
-
Click Save.
Step 3: Monitor Threats
The Security dashboard illustrates threat detection trends and lists recent requests that violated your security policy. This dashboard is a useful tool for:
- Verifying that a new or an updated security policy will not impact legitimate traffic.
- Analyzing threats directed to your site.
Key tips:
-
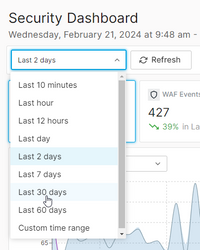
Adjust the dashboard’s time period from the upper-right hand corner.
-
View all events by selecting Total Events or restrict it to a subset of threats by clicking on another tab (i.e., WAF Events, Bot Events, Rate Events, or Client Events).

-
Filter the dashboard to analzye specific trends.
Data Gathering
After your Security Application configuration has been implemented, time needs to pass to allow Security to
gather sufficient data from which trends may be detected. Wait a reasonable amount of time (e.g., 24 hours) after setting up a Security Application configuration before performing data analysis.
Identify Trends
Identify trends by reviewing the Threats view of the Security dashboard.
-
Navigate to the Security dashboard.
- From the Edgio Console, select the desired organization.
- From the Security section, click Dashboard. Verify that the Threats tab is active.
-
Review the top graph. Check for an abnormally high number of detected threats.
Analyze Individual Threats
Ensure that Security is correctly identifying threats by viewing detailed information on detected threats.
-
From the right-hand pane, filter threats by clicking on the desired rule message, URL, user agent, etc.
-
If an alert was generated for a legitimate request, scroll down to the
URLsection of the right-hand pane and click on the desired URL. After which, expand a request from theLog Eventssection and then review the Rule Tags, Matched On, and Matched Value fields to see why the request was flagged.-
Check whether the web application may be changed to prevent this type of request from occurring.
-
Our recommendation is that all of the following conditions be met before disabling a rule:
- Your application cannot be updated to reduce false positives.
- A rule exception cannot be created to eliminate false positives.
- A significant number of requests will be impacted by this rule.
You may safely disable a threat detection policy if it secures a platform (e.g., Drupal, SharePoint, and WordPress) that is not leveraged by your application.If you must disable a rule, then note the values for the Rule Tags and Rule ID fields.-
The Rule Tags field identifies the threat detection policy.
-
Look for the rule ID defined in the Rule ID fields within your managed rule’s policy. Disable that rule.You may filter rules by ID when viewing a managed rule’s policy.
-
-