Bot Manager is designed to mitigate undesired bot traffic and prevent them from performing undesired or malicious activity, such as scraping your site, carding, taking over accounts through credential stuffing, spamming your forms, launching DDoS attacks, and committing ad fraud.
There are three versions of Bot Manager. Key differences between these versions are highlighted below.
Standard Bot Manager: This version is designed to mitigate basic bots by requiring a browser to solve a JavaScript-based challenge.
Advanced Bot Manager: This version provides all of the functionality that comes with Standard Bot Manager. Additionally, it provides:
Automatic detection of known bots (e.g., search engine bots) and bad bots, including those that spoof good bots, through the analysis of requests and behavior.
Additional types of criteria through which you may profile an undesired bot.
Additional enforcement actions that can be applied to bot traffic.
The ability to bypass bot detection for specific traffic profiles.
Actionable near real-time data on detected bots through which you may fine-tune your configuration to reduce false positives.
Premier Bot Manager: This version provides all of the functionality that comes with Advanced and Standard Bot Manager. Additionally, it provides:
Automatic bot detection using dedicated machine learning models tailored to your traffic profile. These models establish a baseline for normal website behavior and then they compare all requests to this traffic pattern.
Bot detection through JA4 signatures.
Bot Manager requires activation. Contact your account manager or our sales department at 1 (866) 200 - 5463 to upgrade your account.
Standard Bot Manager requires a client (e.g., a web browser) to solve a JavaScript-based challenge before resolving the request. Edgio Security blocks traffic when the client cannot solve this challenge within a few seconds. Basic bots typically cannot solve this type of challenge and therefore their traffic is blocked. Learn more.
Premier and Advanced Bot Manager inspect each request to determine whether it is bot traffic.
Does the request match an exception? Exceptions identify trafic that should bypass bot detection.
Does the request match a rule? A rule defines the criteria that our service will use to identify bot traffic.
Identify bots using:
Information derived from the request, such as geolocation, IP address, and the URL path.
Our request and behavioral analysis that assigns a bot score to the request that defines our level of confidence that it is a bot.
You may set actions based off of bot score thresholds.
For example, you may redirect requests whose bot score is between 50 and 80% and block requests whose bot score is greater than 80%.
The JA3 or JA4 (requires Premier Bot Manager or Edgio Premier) fingerprint assigned to the request. Fingerprints allow us to classify traffic.
Does the request match a known good bot (e.g., search bot)?
Does the request spoof a known good bot?
Key information:
Your configuration determines how our service will handle the above traffic patterns.
If a request satisfies multiple criteria, then the above order determines the action that will be applied to it. Specifically, the order of precedence is:
Exceptions > Bots Identified by a Rule > Known Bots > Spoofed Bots
Bypass the above bot detection measures by creating an exception for one or more URL(s), user agent(s), JA3 fingerprint(s), JA4 fingerprint(s), or cookie(s).
If you are using Standard Bot Manager, then you may only apply a browser challenge to requests. If you are using Premier or Advanced Bot Manager, then you may apply any of the following enforcement actions to bot traffic:
Sends a JavaScript-based challenge to the client. The client must solve this challenge within a few seconds.
The client’s response to the browser challenge determines what happens next.
Solved: If the client is able to solve the challenge, then our CDN serves the requested content. Additionally, a cookie will be added to the user’s session. This cookie instructs our CDN to serve content to the user without requiring a browser challenge. Once the cookie expires, new requests for content protected by Bot Manager will once again require the client to solve a challenge.
Define the duration for this cookie through the Valid for (in seconds) option.
Unsolved: If the client is unable to solve the challenge, then our CDN responds with a new browser challenge.
Key information:
Solving a challenge requires a JavaScript-enabled client. Users that have disabled JavaScript on their browsing session will be unable to access content protected by browser challenges.
We strongly recommend that you avoid applying browser challenges to machine-to-machine interactions.
For example, applying browser challenges to API traffic will disrupt your API workflow.
If you are using Premier or Advanced Bot Manager, you may customize the difficulty of the browser challenge by setting the Browser challenge level option to Difficulty-based and then selecting the desired difficulty level.
Choose a difficulty level from 1 to 20. Edgio serves our standard browser challenge when it is set it to 0.
Smaller levels are easier to solve, while larger levels introduce latency.
The amount of latency introduced by a level varies according to the client’s CPU. However, it is safe to assume that double-digit levels may take various seconds to solve.
The HTTP Status Code option determines the HTTP status code for the response provided to clients that are being served the browser challenge.
Setting this option to certain status codes (e.g., 204) may prevent clients that successfully solve a browser challenge from properly displaying your site.
By default, our browser challenge is served through an Edgio-branded page. Serve our browser challenge through your own custom page by enabling the Custom Browser Challenge Page option and then setting the Browser Challenge Page Template option to the desired HTML page. This HTML page must satisfy the following requirements:
It must contain the following mustache: {{BOT_JS}}
This mustache is a placeholder for our JavaScript-based challenge.
Due to the speed at which our JavaScript function is executed, we recommend that you place the {{BOT_JS}} mustache after all rendered content (e.g., near the end of the document’s body).
It must check whether the user agent allows JavaScript using a <noscript> tag. Your custom HTML must display an error message if it has been disabled.
If your scripts sets third-party cookies, then your custom HTML must display an error message if they have been disabled.
Example: HTML code for a sample browser challenge is provided below.
HTML
1<!DOCTYPEHTML>
2<htmllang="en-US">
3<head>
4<title>Validating your browser</title>
5 {{BOT_JS}}
6</head>
7<body>
8<noscript>
9<h1data-translate="turn_on_js"style="color:#bd2426;">Please turn JavaScript on and reload the page.</h1>
Skips either known bot or spoofed bot detection. This enforcement action is only available when setting up known bot detection.
Key information:
Requires Premier Bot Manager, Advanced Bot Manager, Edgio Premier, or Edgio Enterprise.
Edgio can continue to screen requests that skip known bot or spoofed bot screening.
A request can be flagged as a bot through bot rules regardless of whether this enforcement action is applied to a request. This means that it is possible for a bot rule’s enforcement action to be applied to a request instead of this enforcement action.
Performs an automated assessment of a client’s interaction with your site. This assessment, which is performed without user interaction, requires Google reCAPTCHA v3.
The results of the reCAPTCHA determines what happens next.
Acceptable: If the client’s reCAPTCHA score is acceptable, then our CDN serves the requested content. Additionally, a cookie will be added to the user’s session. This cookie instructs our CDN to serve content to the user without performing an additional reCAPTCHA assessment. Once the cookie expires, new requests for content protected by Bot Manager will require the client’s interactions with your site to be reassessed.
Define the duration for this cookie through the Valid for (in seconds) option.
Unacceptable: If the client’s reCAPTCHA score is unacceptable, then the response from the CDN is determined by the enforcement action defined within the reCAPTCHA’s Rule Action option. You may set this option to any enforcement action, with the exception of Browser Challenge, that has been enabled within this bot rule set.
Key information:
Google reCAPTCHA v3 is a score-based system that learns through real traffic. For this reason, we recommend that you avoid applying reCAPTCHA to machine-to-machine interactions.
Setting up reCAPTCHA requires:
Adding reCAPTCHA v3 to your site through Google. Upon adding reCAPTCHA to your site, Google will provide a reCAPTCHA site key and secret key.
Configure a reCAPTCHA action within the desired bot rule set.
From the Bot Rules tab, find the desired bot rule(s) and set the Rule Action option to reCAPTCHA. Save your changes.
From the desired Security Application configuration:
Verify that the Production Bot Manager option is set to the above bot rule set.
Toggle the reCAPTCHA off option to reCAPTCHA on.
Set the reCAPTCHA Site Key option to the site key provided by Google in step 1.
Set the reCAPTCHA Secret Key option to the secret key provided by Google in step 1.
Save your changes.
The Action Status option determines the HTTP status code for the response provided to clients that are being assessed through reCAPTCHA.
Setting this option to certain status codes (e.g., 204) may prevent clients from properly displaying your site.
A request must satisfy at least one rule before Edgio will consider it bot traffic. A rule is satisfied when a match is found for each of its conditions. A condition defines what will be matched (i.e., variable), how it will be matched (i.e., operator), and a match value.
Key information:
Certain variables match on key-value pairs. If you match on multiple keys within a single variable, Edgio Security will only need to find one of those matches to satisfy that variable.
For example, if you set up a request header variable to match for Authorization and Content-Type, then requests that contain either or both of those headers will satisfy that variable.
Bot detection through a Edgio Reputation DB rule has been deprecated. Although existing rules may continue to use this database, you may not assign it to a new rule.
Custom Bot Detection Example:
This example assumes that your Bot Manager configuration contains the following two rules:
Rule
Type
Description
1
Custom matches
This rule contains a single condition.
2
Custom matches
This rule contains two conditions.
Assuming the above configuration, Edgio identifies bot traffic whenever either of the following conditions are met:
A match is found for the variable defined in the first rule’s condition.
A match is found for the variables defined in both of the second rule’s conditions.
A variable identifies the request element that Edgio will analyze.
Key information:
All variables support the ability to match on the number of times that a request element is found within the request. Set up a variable to match on the number of instances instead of inspecting the element for a specific value or regular expression pattern by marking the Count option.
You may define zero or more keys when setting up variables that match on key-value pairs. Edgio must find at least one of the specified keys in the request before that variable will be satisfied.
For example, if you set up a request header variable to match for Authorization and Content-Type, then requests that contain either or both of those headers will satisfy that variable.
Requires Premier Bot Manager, Advanced Bot Manager, Edgio Enterprise, or Edgio Premier. Identifies requests based off a score that defines our level of confidence that it is a bot. This score is calculated by analyzing the request and its behavior. The range for this score is 0 to 100.
Requires Premier Bot Manager, Advanced Bot Manager, or Edgio Premier. Identifies requests by the JA3 fingerprint assigned to the request. A JA3 fingerprint identifies a client using key characteristics from a TLS request. This allows us to classify traffic as a specific bot across various IP addresses and ports.
Requires Premier Bot Manager or Edgio Premier. Identifies requests by the JA4 fingerprint assigned to the request. This method of traffic classification is less prone to evasion techniques than JA3.
All: Match against all cookies by not specifying a cookie name within this variable. Specify the desired cookie value or pattern within the Match value option.
Specific Cookies: Define the name of the desired cookie within this variable. Specify the desired cookie value or pattern within the Match value option.
Setting up a cookie variable also allows you to define whether Edgio uses a regular expression, a negative match, or both when comparing the value assigned to the variable against cookies. Use a negative match to find requests that do not contain the specified cookie.
All: Match against all request headers by not specifying a request header name within this variable. Specify the desired header value or pattern within the Match value option.
Specific Request Headers: Define the name of the desired request header within this variable and specify the desired header value or pattern within the Match value option.
Setting up a request header variable also allows you to define whether Edgio uses a regular expression, a negative match, or both when comparing the value assigned to the variable against request headers. Use a negative match to find requests that do not contain the specified request header.
Match against the request’s URL path and query string. Define a URL path that starts directly after the hostname. Exclude the protocol and hostname when defining this property.
Sample values:/marketing?id=123456 and /resources/images
Match against the request’s URL path. Define a URL path that starts directly after the hostname. Exclude the protocol, hostname, and query string when defining this property.
Default: By default, Edgio compares a match value against the request element identified by a variable (e.g., URL path or a request header’s value).
Count: Enable the Count option on a variable to compare this value against the number of times that the request element identified by a variable (e.g., a specific cookie or request header) occurs within the request.
Example:
This example assumes the following configuration:
1Variable: Request header = Authentication
2Match value: 1
We will now examine how the Count option affects comparisons for this configuration.
Disabled: If the Count option has been disabled on the variable, then Edgio will compare the value of the
Authentication request header to 1.
Enabled: If the Count option has been enabled on the variable, then Edgio will compare the number of times that the Authentication request header occurred in the request to 1.
The type of comparison that will be performed is determined by the Operator option.
Premier and Advanced Bot Manager allow you to exempt traffic from bot detection by URL, user agent, JA3 fingerprint, and cookie. Premier Bot Manager and Edgio Premier customers may also exempt traffic by JA4 fingerprint.
Key information:
Define each entry on a separate line.
URL, user agents, and cookies are regular expressions.
A JA3 or JA4 fingerprint identifies a client using key characteristics from a TLS request.
Our service will only bypass bot detection when it finds an exact match for an exception.
Use the Security dashboard to find the JA3 or JA4 fingerprint that corresponds to a false positive.
You may create, modify, and delete Bot Manager configurations.
Key information:
Administer Bot Manager configurations from the Bot Manager page.
Apply a Bot Manager configuration to production traffic by adding it to a Security Application configuration. Multiple Security Application Manager configurations may use the same Bot Manager configuration.
It typically takes less than a minute to apply Bot Manager configuration changes across our entire network.
To create a Bot Manager configuration
Navigate to the Bot Manager page.
From the Edgio Console, select the desired organization.
From the Security section, click Bot Manager.
Click + New Bot Manager.
In the Name option, type the unique name by which this Bot Manager configuration will be identified. This name should be sufficiently descriptive to identify it when setting up a Security Application Manager configuration.
Set up the desired enforcement action(s).
Standard Bot Manager: This version only supports browser challenges. Review and revise your browser challenge configuration as needed and then skip to step 6.
Premier and Advanced Bot Manager: These versions support all enforcement actions.
The behavior of the alert, block, and silent close actions cannot be configured.
Unlike other enforcement actions, you must configure the reCAPTCHA and redirect actions before they will be available for selection as enforcement actions.
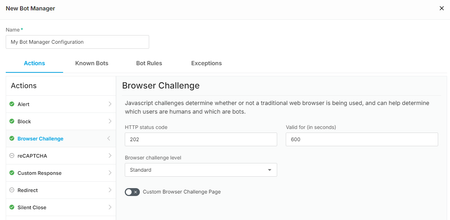
Browser Challenge
The default configuration is suitable for basic bot mitigation. Perform the following steps to customize this enforcement action:
From the HTTP status code option, determine the HTTP status code for the response provided to clients that are being served the browser challenge.
Setting this option to certain status codes (e.g., 204) may prevent clients that successfully solve a browser challenge from properly displaying your site.
From the Valid for (in seconds) option, type the number of seconds for which our CDN will serve content to a client that solves a browser challenge without requiring an additional browser challenge to be solved. Specify a value between 1 and 1,000,000 seconds.
Serve a custom browser challenge by enabling the Custom Browser Challenge Page option and then setting the Browser Challenge Page Template option to the desired payload.
Premier and Advanced Bot Manager: Increase the difficulty of this JavaScript-based challenge by setting the Browser challenge level option to Difficulty-based and then selecting the desired difficulty from the Browser challenge difficulty option.
Custom Response
Perform the following steps:
From the Actions section, select Custom Response.
In the Response Body option, specify the body of the response that will be sent to clients.
In the HTTP status code option, set the HTTP status code for the response that will be sent to clients.
In the Response Headers option, define each desired custom response header on a separate line.
Example:MyCustomHeader: True
reCAPTCHA
Perform the following steps to set up a reCAPTCHA:
Set the Rule Action option to the enforcement action that will be applied when a client’s reCAPTCHA score falls below an acceptable level.
In the Action Status option, set the HTTP status code for the response provided to clients that are being served the reCAPTCHA.
Setting this option to certain status codes (e.g., 204) may prevent clients from properly displaying your site.
In the Valid for (in seconds) option, type the number of seconds for which our CDN will serve content to a client with an acceptable reCAPTCHA score without reassessment. Specify a value between 1 and 1,000,000 seconds.
You must enable reCAPTCHA within a Security Application configuration and provide your Google reCAPTCHA site and secret keys.
Redirect
Set the URL option to the full URL to which requests will be redirected.
Premier and Advanced Bot Manager: Set up known bot and spoofed bot detection.
Click the Known Bots tab.
Configure the enforcement action for known bots and traffic that spoofs them.
Select the desired type of bot from the left hand pane.
From the Default Known Bot Action option, select the default type of enforcement action that will be applied for the current bot category.
From the Default Spoof Bot Action option, select the default type of enforcement action that will be applied to traffic that spoofs the current bot category.
From the Action Overrides section, review your configuration and override it as needed.
Override a bot token’s enforcement action by selecting a different enforcement action from the Action column.
Override the enforcement action for traffic that spoofs a specific bot by selecting a different enforcement action from the Spoof Bot column.
Certain bot categories contain an other entry. This entry represents a collection of lesser-known bots.
Repeat the above steps for each bot category.
Review the default rule(s) for identifying bots from the Bot Rules tab.
Standard Bot Manager: By default, a browser challenge will be served when the request’s user agent contains the word bot.
Premier and Advanced Bot Manager: A new Bot Manager configuration contains the following two rules:
Bot Score > 90: This rule flags a request when its bot score is greater than 90. A high bot score is a good indicator that the request was submitted by a bot.
JA3 Block placeholder: Update the placeholder value defined within this rule with the JA3 fingerprints that will be blocked. If you do not wish to block requests by JA3 fingerprint, then you should delete this rule by clicking on it and then clicking the icon.
Optional. Create rules for identifying bots from the Bot Rules tab. A rule is satisfied when a match is found for each of its conditions.
Click + New Rule.
In the Rule message option, type a brief description for this rule.
In the Rule Action option, choose how this rule will be enforced.
In the Rule ID option, specify a number between 77,000,000 and 77,999,999.
Modify the default condition to determine how Edgio will identify requests.
From the condition’s Variable option, select the request element through which Edgio will identify requests.
Certain variables (e.g., request cookies and request header) match on name and value. If you have selected this type of variable, then perform the following steps:
Under the Matches section, click + Add Match.
From the Name option, type the desired name (e.g., cookie name or the request header name).
For example, match for requests that contain an Authorization header by setting this option to Authorization.
Optional. Mark the Negative Match option to match for requests that do not contain a matching value for the name defined in the previous step.
If you specified a regular expression in the Name option, then you should mark the Regex Match option.
Optional. Add another match through which this variable can be satisfied by repeating the above steps.
From the Operator option, select an operator that determines how Edgio will compare the match value to the request element identified by the above variable.
In the Match value option, type either of the following values:
Count Option - Disabled: Type the value that will be compared against the value associated with the request element identified by the variable selected in step a.
Count Option - Enabled: Type the number of instances that a match must be found within a single request.
For example, if you are counting the Set-Cookie header, then this numerical value determines the number of times that the Set-Cookie header must be found within a request.
Optional. Mark the Negative Match option to match for requests that do not contain a matching value for the value defined in the previous step.
Optional. Add another condition by clicking + Add Condition.
A rule’s action is only applied to a request when it satisfies all of the conditions defined within that rule.
Optional. Add another rule by repeating the above steps.
Premier and Advanced Bot Manager: Optional. Identify traffic that will bypass bot detection.
Click the Exceptions tab.
Add the desired URL(s), user agent(s), JA3 fingerprint(s), JA4 fingerprint(s), and cookie(s) as exception(s).
Add an entry by typing it and then pressing ENTER.
Click Save.
To modify a Bot Manager configuration
Navigate to the Bot Manager page.
From the Edgio Console, select the desired organization.
From the Security section, click Bot Manager.
Click on the desired bot rule set.
Make the desired changes.
Key tasks:
Premier and Advanced Bot Manager: Add, modify, or delete an action.
Premier and Advanced Bot Manager: Set or modify the action that will be taken for all known bots, specific known bots, and spoofed bots from the Known Bots tab.
Premier and Advanced Bot Manager: Update your exceptions to bot detection by adding, modifying, or deleting entries from the Exceptions tab.
Change the type of rule from the Rule type option.
Custom matches only: Delete variables and matches within a variable by clicking the (delete) icon.
Custom matches only: Delete a condition by clicking Delete Condition.
A rule must have at least one condition. Therefore, you cannot delete the root condition.
Delete a rule by clicking Delete Rule and then clicking Confirm.
Click Save.
To delete a Bot Manager configuration
You cannot delete a Bot Manager configuration that is associated with a Security Application configuration. Please either modify the Security Application configuration to point to a different Bot Manager configuration or delete that Security Application configuration.
Navigate to the Bot Manager page.
From the Edgio Console, select the desired organization.
From the Security section, click Bot Manager.
Click on the desired Bot Manager configuration.
Click Delete.
When prompted, confirm the deletion by clicking Confirm.
Compare a previous version of a configuration to the current version.
Edgio Security Premier and Business support a rolling window of up to 200 versions, while Edgio Security Essentials and Insights is restricted to a rolling window of up to 100 versions.
An advantage of using version control is that it allows you to quickly roll back to a previously vetted configuration. For example, if you notice that a new configuration has resulted in more false positives, then you can roll back to the previous version before analyzing the data.
To view, compare, and reactivate a previous configuration
Load the desired security configuration (e.g., access rule, rate rule, or custom rule).
Click Versions.
Click on the desired version to view it.
Optional. Compare the version selected in the previous step to the current version by clicking Diff. Differences between those two versions are highlighted in green (new or updated lines) and red (modified or deleted lines).
Optional. Reactivate the version selected in step 3 by clicking Reactivate. Click Reactivate this version to confirm that it will be reactivated.