As part of our filing for Chapter 11 bankruptcy relief, Akamai has acquired select assets from Edgio, including certain customer contracts from our content delivery, applications, and security businesses, but not including Uplynk. We encourage any active Edgio delivery, applications, or security customers that are not already engaged with Akamai to migrate their services, to contact their local Akamai office or support@edg.io as soon as possible to help avoid service interruptions. Service will end on January 15, 2025.
The Security Application Manager page contains the Security Application configurations that Edgio may use to screen your traffic. Traffic is screened using the first eligible Security Application configuration according to the order in which they are listed.
Access Rules: An access rule identifies legitimate traffic and threats through access control lists.
API Security Ruleset: An API Security rule validates the payload for POST, PUT, and PATCH requests against a JSON schema.
Rate Rules: A rate rule defines the rate of traffic that may be directed to one or more web sites.
Bot Manager: A bot manager configuration identifies bot traffic.
Custom Rules: A custom rule identifies threats using custom criteria that takes into account your site’s traffic profile to avoid false positives.
Managed Rules: A managed rule identifies threats through threat detection policies.
Client-Side Protection Policy: A Client-Side Protection policy detects and mitigates attacks, such as cross-site scripting (XSS) and code injection, by applying a Content Security Policy to your traffic.
Determines how violations of your access rules, API security rulesets, rate rules, custom rules, and managed rules are enforced.
Allows you to audit new access rules, API Security rules, custom rules, managed rules, and Client-Side Protection policy without impacting production traffic and while keeping your applications secure with known configurations.
From the Security dashboard, click WAF Events and then filter by Profile Type = AUDIT to isolate and analyze threats detected as a result of an audit of new access rules, API Security rules, custom rules, and managed rules.
The ability to secure and audit your production traffic using separate configurations requires Edgio Premier, Business, or Essentials. Contact your account manager or our sales department at 1 (866) 200 - 5463 to upgrade your account.
Identifying Traffic for Inspection #
Screen all traffic with this Security Application configuration or restrict screening by hostname, URL path, or both.
By default, a Security Application configuration applies to all hosts. However, you may restrict security screening to requests to one or more hosts.
Key information:
Edgio Security compares the entire Host header value against the specified value.
The Host header identifies either a hostname or IP address using the following syntax:
<Host>
<Host>:<Port>
The CDN only accepts HTTP/HTTPS requests on standard ports (i.e., 80 and 443). Typically, a Host request header does not include port information for standard ports. However, the requesting user agent defines the Host request header submitted to the CDN.
For the purpose of this comparison, the hostname defined by this match condition will not be resolved to an IP address.
For the purpose of this comparison, an origin configuration’s Override Host Header option is irrelevant.
By default, a Security Application configuration applies to all URL paths. However, you may restrict security screening to requests to one or more URL paths. Edgio Security compares the entire URL path against the specified value.
Key information:
URL path comparisons start directly after the hostname.
/<Path>/<Asset>
Example:
/marketing/brochures/widget.htm
A partial match does not count towards the rate limit.
Example:
Given the above sample configuration, the following request would not count towards the rate limit:
Your Security Application configuration determines how Edgio Security compares a request’s host or URL path against the specified value. The available modes are listed below.
Default: Edgio Security will not perform a comparison. It will apply the current Security Application configuration to all hosts or URL paths.
Wildcard match: Use this mode to specify a wildcard pattern.
Regex match: Use this mode to specify a regular expression.
Wildcard and regular expression match comparison modes require Edgio Premier, Business, or Essentials. Contact your account manager or our sales department at 1 (866) 200 - 5463 to upgrade your account.
Edgio Security compares the specified value(s) against the entire host or URL path.
It will only apply this Security Application configuration to a request when one of the specified value(s) is an exact match. This comparison is case-sensitive.
Requires Security Premier, Business, or Essentials. Edgio Security checks whether the entire host or URL path is a case-sensitive match for the wildcard pattern. The supported set of wildcards are listed below.
*: Matches zero or more characters.
Sample Configuration
Matches
Does Not Match
cat*
cat category muscat
cAt Category
?: Matches a single character.
Sample Configuration
Matches
Does Not Match
cat?
cats muscats
Cats cat
[abc]: Matches a single character defined within the brackets.
Sample Configuration
Matches
Does Not Match
[cm]art
cart mart
tart start
[a-z]: Matches a single character from the specified range.
Sample Configuration
Matches
Does Not Match
[a-z]art
cart mart tart
Cart marT start
[!abc]: Matches a single character that is not defined within the brackets.
Sample Configuration
Matches
Does Not Match
[!cm]art
Cart Mart tart
cart mart tArt
[!a-z]: Matches a single character that is excluded from the specified range.
Sample Configuration
Matches
Does Not Match
[!a-m]art
Cart Mart tart
cart mart tArt
Example:
Setting the URL path(s) option to /marketing/* allows Edgio Security to apply this Security Application configuration to any request whose URL path starts with /marketing/.
The following sample request matches the above pattern:
Requires Security Premier, Business, or Essentials. Edgio Security checks whether the entire host or URL path is a match for the pattern defined in a regular expression.
Identify threats by adding the following rule(s) to your Security Application configuration:
Access Rules: An access rule identifies legitimate traffic and threats through access control lists.
API Security Ruleset: An API Security rule identifies threats by validating the payload of POST, PUT, and PATCH requests against a JSON schema.
Rate Rules: A rate rule defines a limit for the rate at which your content may be requested.
Requests that originate from rate limited clients will not count towards the rate limit. Upon the expiration of the time period defined in the Time period option, we will resume counting these requests. If the client exceeds the rate limit again, then this action will be reapplied to it for the duration defined by this option. A “client” is defined by each rate rule’s Apply rate limit to option. Learn how rate limits are applied to clients.
Bot Manager: A bot manager configuration determines how bot traffic will be detected and the enforcement action that will be applied to bot traffic.
Bot Manager Standard is restricted to serving browser challenges.
Custom Rules: A custom rule identifies threats using custom criteria that takes into account your site’s traffic profile to avoid false positives.
Managed Rules: A managed rule identifies threats through threat detection policies.
Client-Side Protection Policy: A Client-Side Protection policy detects and mitigates attacks, such as cross-site scripting (XSS) and code injection, by applying a Content Security Policy to your traffic.
Threat Detection Mode #
You may apply an access rule, API security ruleset, custom rule, managed rule in one of the following modes:
Production: This mode secures your application by allowing you to choose from a variety of actions through which your security policy will be enforced.
Audit: This mode allows you to test new security policies without impacting production traffic.
Key information:
Requests that are identified as threats by a rule running in audit threat detection mode are solely logged. View this log data through the Security dashboard.
Track threats identified by your audit security policy by filtering the WAF Events view of the Security dashboard by the audit profile type.
Once you are confident that an audit security rule will generate minimal false positives, you should set your production threat detection to it.
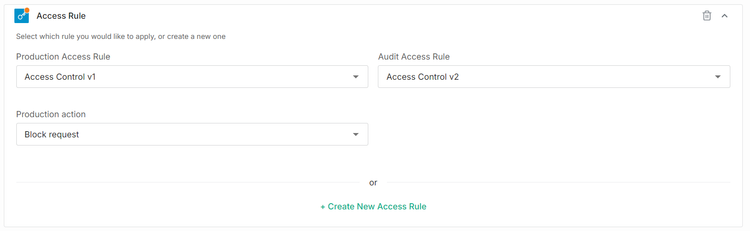
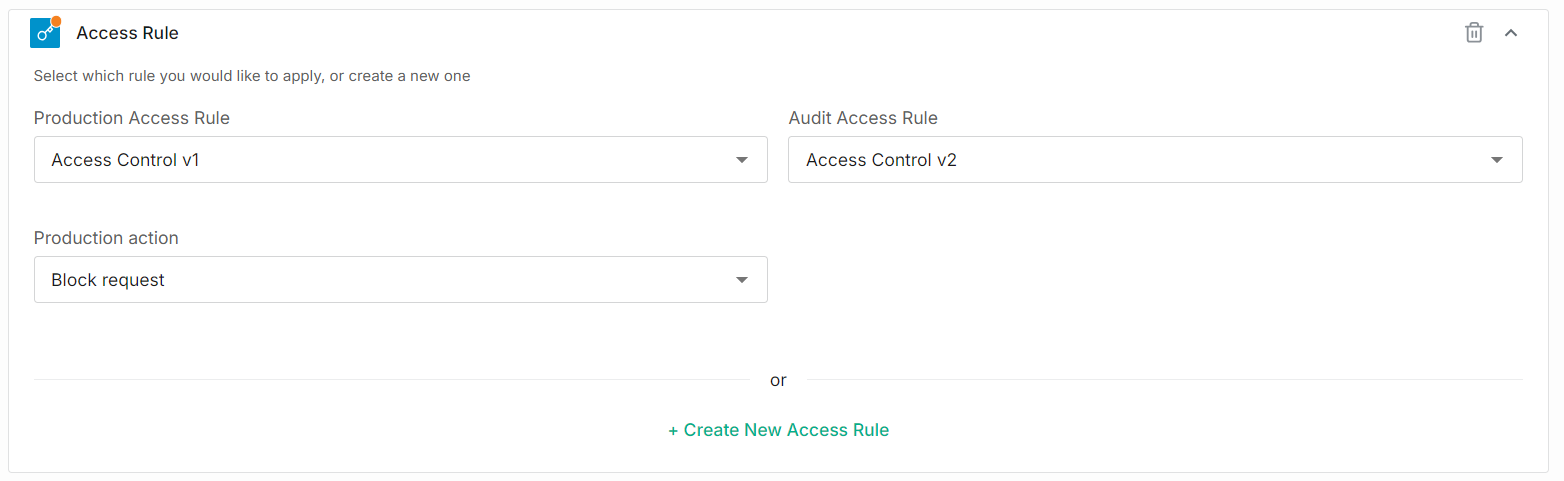
For example, once you are confident that the Access Control v2 access rule returns minimal false positives, then you should set the Production Access Rule option to it.
Rate rules and Bot Manager may only run in production mode. You cannot run them in audit mode.
A Client-Side Protection policy allows you to define both an audit and a production Content Security Policy (CSP). Restrict the Security dashboard to only display requests that violated your audit CSP by clicking the Client Events tab and then filtering for Disposition=report.
Although you may audit a security policy that has been applied to production traffic (i.e., production mode), this will cause the same threat to be logged twice.
Edgio uses a client’s IP address in various ways, such as identifying the client’s geolocation for use with access control lists and rate limiting. By default, Edgio gets a client’s IP address from the request submitted to our network. However, you may wish to override this behavior under certain circumstances, such as testing or if Edgio is behind another CDN. For these cases, you can instruct Edgio to look up a client’s IP address through a request header by setting a Security Application’s Use Header for Client IP option to the desired request header.
Enabling this advanced setting has the potential to negatively impact Edgio Security’s ability to secure or rate limit your traffic. Edgio does not validate the request header defined within the Use Header for Client IP option. We strongly recommend that you verify the spelling of the request header’s name. You should also verify that the request header will be populated with the desired IP address(es).
Edgio Security applies a single enforcement action per mode (i.e., production or audit). Once enforcement is triggered for that mode, Edgio Security does not perform further evaluation of that request. If you are setting up a rule in production mode, we recommend that you limit your use of the Alert Only enforcement to the shortest amount of time necessary to validate changes to your configuration.
Rate limited requests or detected threats will receive a custom response.
Response Body: Define the payload that will be delivered to the client in response to a detected threat.
This option supports the use of event variables to customize the response according to the detected threat.
Sample payload for a CSS file:
1body {
2
3 background-color: #ffffff;
4}
HTTP Status Code: Defines the HTTP status code that will be sent to the client.
View valid status codes.
100
101
102
200
201
202
203
204
205
206
207
208
226
300
301
302
303
304
305
306
307
308
400
401
402
403
404
405
406
407
408
409
410
411
412
413
414
415
416
417
421
422
423
424
426
428
429
431
451
500
501
502
503
504
505
507
508
509
510
511
Custom Response Headers: Defines one or more response headers that will be sent to the client. Add a custom response header by clicking + Add Response Header, setting the Name option to the name of the response header, and then setting the Value option to the response header value.
This option supports the use of event variables to customize the response according to the detected threat.
All characters, including spaces, will be treated as a part of the specified header name or value, respectively.
Each detected threat is logged regardless of enforcement action (i.e., block, custom response, redirect, or alert). View logged threats from the Threats, Bots, Rates, or Rate Enforcement tabs of the Security dashboard.
Sensitive data (e.g., credit card information or passwords) can be redacted from our event logs.
Edgio can add custom headers to requests that meet the following conditions:
Edgio Security generated an alert for the request. All other enforcement actions prevent Edgio from communicating with the origin server.
The request was forwarded to an origin server because it could not be served from cache.
These custom headers may return any of the following information:
Known Bot: Returns 1 if the request was categorized as a known bot. Otherwise, returns 0.
Bot Score: Indicates the request’s bot score. This score indicates our level of confidence that the request originated from a bot.
WAF Score: Indicates the request’s anomaly score. This score is determined by the number of rules that were violated and their severity.
Set up origin signaling by enabling the Origin Signal Header section within the desired Security Application configuration and then defining the custom headers that will be included with requests forwarded to an origin.
The recommended practice is to create a Security Application configuration that is tuned for each of your applications. This allows you to apply a restrictive security policy with minimal false positives. Each Security Application configuration’s host and URL path conditions determine the set of traffic to which it may be applied. If a request is eligible to be screened by multiple Security Application configurations, then Edgio Security will screen it using the first eligible configuration in the list.
Key information:
If you plan on using multiple Security Application configurations, then you should typically order them from narrowest to broadest scope (i.e., Hostname and URL path).
Example: Ordering your configurations as indicated below allows you to apply different security policies according to the type of request (i.e., API requests, script requests, main web site requests, and all other requests):
Position
Security Application Configuration
Hostname
URL Path
1
API Requests
api.example.com
Default
2
Scripts
www.example.com
/scripts/*
3
Main Site
www.example.com
Default
4
All Sites
Default
Default
Reordering these configurations would drastically affect how your traffic is screened.
By default, a Security Application configuration applies to all requests. If the All Sites Security Application configuration were moved to the first position, then it would screen all requests and prevent your other Security Application configurations from being applied to your traffic.
If you were to swap the Scripts Security Application configuration with Main Site, then the Main Site Security Application configuration would screen all requests for www.example.com. Your traffic would never be screened by the Scripts security configuration.
Reorder Security Application configurations by dragging the desired configuration’s icon to the desired position.
You may create, modify, and delete Security Application configurations.
Key information:
Administer Security Application configurations from the Security App page.
Identify the set of traffic (e.g., all requests or by origin) to which your security policy will be applied by balancing the need to secure as much traffic as possible with the level of restrictive measures imposed by it.
The recommended approach is to apply the most restrictive policy to as much traffic as possible while causing minimal impact to data delivery.
Rules are administered independently from Security Application configurations. This allows you to use the same rule within multiple Security Application configurations. Leverage this capability to tailor security screening by application or traffic
profile.
Use audit mode to verify that new access rules, API Security rules, custom rules, and managed rules will not generate substantial false positives.
It may take up to 2 minutes for an updated Security Application configuration to be applied across our entire network.
To create a Security Application configuration
Navigate to the Security Application Manager page.
From the Edgio Console, select the desired organization.
From the Security section, click Application Manager.
Click + Create New.
In the Security Application Name option, type the unique name by which this Security Application configuration will be identified. After which, click Continue.
Optional. From the Hostname and URL Paths section, identify the set of traffic to which this security policy will be applied.
Restrict this security policy by hostname, URL path, or both by configuring the Hostname and URL path(s) options, respectively. Before you can specify a hostname or URL path, you must first select one of the following modes:
Default: Use this mode to apply this Security Application configuration regardless of the request’s host or URL path.
Exact match (multiple entries): Use this mode to apply this Security Application configuration to the specified hostname(s) or URL path(s).
Wildcard match: Use this mode to apply this Security Application configuration to all hostnames or URL paths that satisfy the specified wildcard pattern.
Regex match: Use this mode to apply this Security Application configuration to all hostnames or URL paths that satisfy the specified regular expression pattern.
Enable the Negative match option to configure a Security Application configuration to look for requests that do not match the specified value or pattern.
Optional. Set up an access control policy by assigning an access rule to the Security Application configuration.
Click Access Rule. An Access Rule section will appear.
If the desired access rule does not currently exist, then you should create it now by clicking on + Create New Access Rule.
From the Production Access Rule option, select the desired access rule.
From the Production action option, determine how threats identified by the access rule selected in the previous step will be handled (i.e., block, alert, redirect, or send a custom response).
From the Production API Security Rule option, select the desired API Security ruleset.
From the Production action option, determine how threats identified by the API Security ruleset selected in the previous step will be handled (i.e., block, alert, redirect, or send a custom response).
If the selected rate rule contains a condition group, then a request must satisfy the Security Application configuration’s host and URL path match conditions and all of the conditions within at least one condition group in order to be eligible for rate limiting.
From the Action option, select how requests that exceed the limit defined within this rate rule will be handled (i.e., drop request, alert, redirect, or send a custom response).
From the Time period option, select the time period for which the action selected in the previous step will be applied to clients that exceed the rate limit defined in the rate rule selected in step 7.3.
A “client” is defined by each rate rule according to the Apply rate limit to option. For example, configuring that option to Any request will apply the selectedaction to all requests regardless of the number of requests generated by each device. Alternatively, identifying clients by IP Address will only apply the selected action to requests that originate from each IP address that violates the specified rate limit.
If you would like to apply an additional rate limit, then repeat steps 7.ii - 7.v.
Use multiple rate rules to apply different rate limits to various traffic profiles. Set up this type of configuration using either a single or multiple Security Application configurations. If you assign multiple rate rules to a single Security Application configuration, then each rate rule should contain one or more condition group(s).
Optional. Determine how bots will be detected by assigning a bot manager configuration to the Security Application configuration.
Click Bot Manager. A Bot Manager section will appear.
If the desired bot manager configuration does not currently exist, then you should create it now by clicking on + Create New Bot Manager Rule.
From the Production Custom Rule option, select the desired custom rule.
From the Production action option, determine how threats identified by the custom rule selected in the previous step will be handled (i.e., block, alert, redirect, or send a custom response).
From the Production Managed Rule option, select the desired managed rule.
From the Production action option, determine how threats identified by the managed rule selected in the previous step will be handled (i.e., block, alert, redirect, or send a custom response).
From the Select Policy option, select the desired Client-Side Protection policy.
The Client-Side Protection policy’s configuration determines whether its production and audit Content Security Policy will be applied to your traffic through the Content-Security-Policy and Content-Security-Policy-Report-Only response headers, respectively.
Add a header that will be included with requests forwarded to an origin.
From the Signal option, select the type of information that will be reported by that custom header.
From the Request Header Name option, assign a name for this custom header.
Optional. Add another custom request header by clicking + Add Header and then repeating the previous step.
Click Save & Continue.
If no additional changes to your security configuration are needed, then click Deploy Changes to allow these changes to take effect.
To reorder Security Application configurations
Navigate to the Security Application Manager page.
From the Edgio Console, select the desired organization.
From the Security section, click Application Manager.
Drag the desired configuration’s icon to the desired position.
If no additional changes to your security configuration are needed, then click Deploy Changes to allow these changes to take effect.
Traffic is always screened using the first eligible Security Application configuration. If multiple Security Application configurations are applicable to the same request, then consider updating their host or URL path conditions to a more restrictive pattern.
To modify a Security Application configuration
Navigate to the Security Application Manager page.
From the Edgio Console, select the desired organization.
From the Security section, click Application Manager.
Click on the desired Security Application configuration.
Make the desired changes.
Click Save & Continue.
If no additional changes to your security configuration are needed, then click Deploy Changes to allow these changes to take effect.
To delete a Security Application configuration
Navigate to the Security Application Manager page.
From the Edgio Console, select the desired organization.
From the Security section, click Application Manager.
Click on the desired Security Application configuration.
Click the icon.
When prompted, confirm the deletion by clicking Confirm.
If no additional changes to your security configuration are needed, then click Deploy Changes to allow this deletion to take effect.
View a previous version of your Security Application configuration.
Reactivate a previous version of your Security Application configuration.
Compare a previous version of your Security Application configuration to the current version.
Edgio Security Premier and Business support a rolling window of up to 200 versions, while Edgio Security Essentials and Insights is restricted to a rolling window of up to 100 versions.
An advantage of using version control is that it allows you to quickly roll back to a previously vetted configuration. For example, if you notice that a new configuration has resulted in more false positives, then you can roll back to the previous version before analyzing the data.
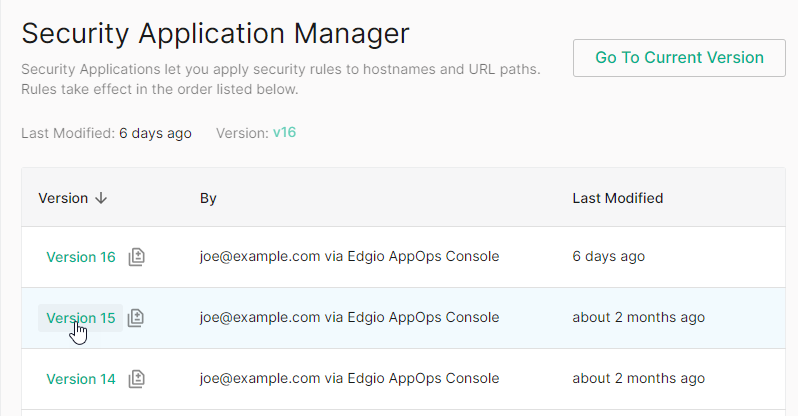
To view, compare, and reactivate a previous configuration
Navigate to the Security Application Manager page.
From the Edgio Console, select the desired organization.
From the Security section, click Application Manager.
Click Versions.
Optional. Compare the current version with a previous one by clicking the icon next to the desired previous version. Differences between those two versions are highlighted in green (new or updated lines) and red (modified or deleted lines).
Click on the desired version to view it.
Optional. Reactivate the version selected in the previous step by clicking Reactivate. Click Reactivate this version to confirm that it will be reactivated.