You may create properties within a private space or an organization.
Private: Access to properties created within a private space is restricted to your user account. You should only use this space for properties that do not require collaboration.
If you have not created an organization yet, then the Edgio Console will only display your private space.
Organization: Edgio allows you to collaborate with other team members through an organization. An organization provides a hub for all property-related tasks, such as managing a property’s configuration, deploying code, and reviewing analytics.
A breakdown of organization and private spaces is illustrated below.
From the Edgio Console, click on the icon next to your name and then click on Create an Organization.
In the Organization Name option, assign a name to your organization (e.g., my-company) and then click Create an Organization.
As shown above, the URL for your organization’s Web Properties page is formed by appending your organization’s name to the Edgio Console’s base URL. Additionally, an organization’s edge link starts with the organization’s name (e.g., https://my-company-nature-videos-production.edgio.link/).
Upon creating a user, you must assign a role that will be applied at the organization level. By default, this role is applied across all of the organization’s properties and environments. However, you may customize a member’s access by granting one of the following roles to a specific property or environment: Viewer, Purger, Editor, or Maintainer.
Role
Description
None
This role, which is only available at the organization level, does not grant any permissions to the organization. As a result, a member that has been granted this role will not inherit permissions to properties or environments by default. This allows you to restrict a member’s access to properties or environments to which you have explicitly granted permissions.
Viewer
This role grants read-only access.
If applied at the organization level, then the user will have read-only access to the organization’s settings, properties, and environments.
Purger
This role grants the Viewer role along with the ability to purge content.
If applied at the organization level, then the user may purge content for any of the organization’s properties.
Security Auditor
This role grants the Viewer role along with the ability to view all security-related features.
Security Manager
This role grants the Viewer role along with the ability to manage all security settings.
Editor
This role grants the capability to configure properties and to configure, deploy, and purge environments. However, this role does not grant the ability to configure, deploy, or purge an environment that has been restricted to the Maintainer role.
Maintainer
This role grants the Editor role along with the ability to create and delete properties and environments.
Admin
This role grants full access to the entire organization including the ability to manage members and API clients.
To add members
Load the desired organization’s Members page.
From the Edgio Console, select the desired organization.
From the left-hand pane, click Members.
Click Add Member.
From the User Email option, type the user’s email address.
From within the ORGANIZATION section, select the role that will be assigned to the user.
By default, the organization’s properties and environments will inherit the role assigned to the user at the organization level.
Customize a user’s access to a property by assigning a different role for the desired property.
Below the ORGANIZATION section, find and expand the desired property.
Filter your properties by typing the desired name within the Search Properties option.
Select the desired role.
Repeat these steps as needed.
Customize a user’s access to an environment by assigning a different role for the desired environment.
Expand the desired property. All of the property’s environments are listed directly below the list of available roles.
Find the desired environment and select the desired role.
Repeat these steps as needed.
Click Invite to send a welcome email.
A new user must confirm their account by performing the following steps:
Click CONFIRM MY ACCOUNT from the welcome email.
Click Accept to accept our terms of service and privacy policy.
Set their password or link their account to Github, Google, or Microsoft.
Existing Edgio users do not need to confirm their account and will not receive a welcome email.
To change a user’s role
Load the desired organization’s Members page.
From the Edgio Console, select the desired organization.
From the left-hand pane, click Members.
Find the user and click its icon.
Optional. Assign a different role at the organization level.
Optional. Customize a user’s access to a property by assigning a different role for the desired property.
Optional. Customize a user’s access to an environment by assigning a different role for the desired environment.
Click Save.
To remove a member
Load the desired organization’s Members page.
From the Edgio Console, select the desired organization.
From the left-hand pane, click Members.
Click the icon next to the member that will be removed.
When prompted, click Delete to confirm that the user will be removed from the organization.
Edgio offers single sign-on (SSO) integration for SAML 2.0 identity providers. This type of integration allows Edgio to delegate authentication to your identity provider. We support the following workflows:
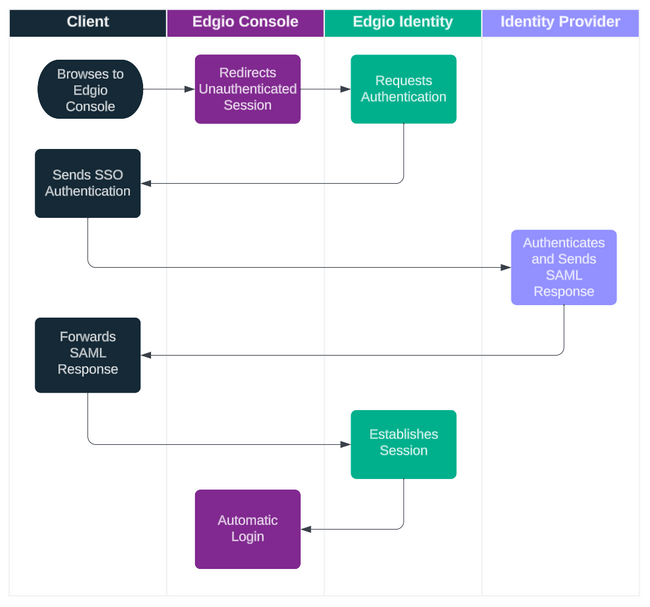
Edgio-Initiated Workflow: This common SSO workflow requires users to browse to the Edgio Console. After which, Edgio will authenticate the user’s identity with your identity provider. A high-level overview of this workflow is illustrated below.
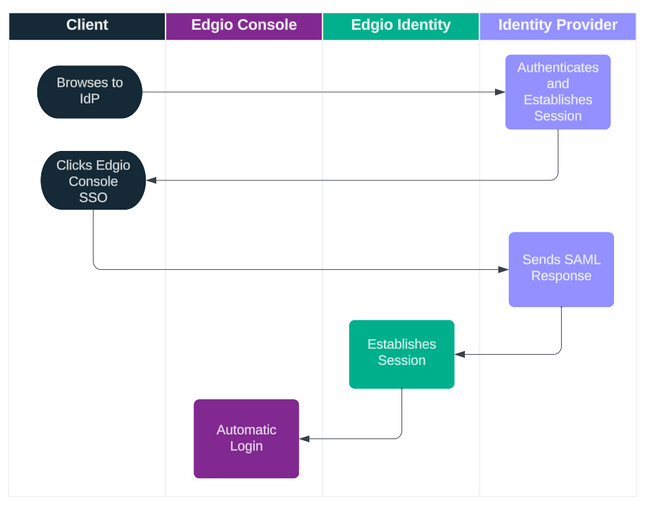
Identity Provider-Initiated Workflow: This SSO workflow requires users to load the Edgio Console through your identity provider. A high-level overview of this workflow is illustrated below.
Establishing a SSO workflow requires a custom integration between our identity service and your identity provider.
To request SSO integration with a SAML 2.0 identity provider
Contact your account manager or our sales department at 1 (866) 200 - 5463 to get started. Be prepared to provide the following information:
SAML Request Signing Certificate: An X.509 certificate in PEM format. Edgio uses this certificate to sign the SAML request sent to your identity provider.
Login URL: Edgio redirects users to this URL to perform an authentication challenge.
Logout URL: Edgio requests a single or global logout through this URL.
RelayState: Edgio redirects users to this URL upon authentication. This URL should be:
https://api.edgio.app/initiate-sso
SAML 2.0 metadata in XML format.
Add the desired users to the Edgio Console. Make sure that the email addresses defined within the Edgio Console match those defined within your identity provider.
From within your identity provider, use the following information to configure Edgio as a service provider:
Entity ID:https://id.edgio.app
Assertion URL:https://id.edgio.app/saml/assert
Login URL:https://id.edgio.app/saml/login
Logout URL:https://id.edgio.app/saml/logout
Digest:sha256 | sha512
Signature:sha256 | sha512
Sign Request:TRUE | FALSE
Sign Response:TRUE | FALSE
Encrypt Assertion:TRUE | FALSE
Set up a SAML assertion subject for each email address that should have SSO access to the Edgio Console.
Set the Subject NameID value to the email address format. The vendor-specific attibute for the email address claim is typically either email or emailaddress. Choose the correct attribute for the NameID format.
Optional. Set up custom attribute statements for the user’s name. Use the following schema namespaces:
Maintain SSO operability by renewing your SAML request signing certificate prior to expiration. Certificate renewal requires providing a new SAML request signing certificate in PEM format to either your account manager or technical customer support.


 As shown above, the URL for your organization’s Web Properties page is formed by appending your organization’s name to the Edgio Console’s base URL. Additionally, an organization’s edge link starts with the organization’s name (e.g.,