Edgio Attack Surface Management (ASM) allows you to monitor and secure your organization’s attack surface. It provides a comprehensive inventory of your organization’s internet-facing assets, technologies, and vulnerabilities.
Collection: A collection represents the segment(s) of your network that will be scanned for vulnerabilities.
Assets: Your assets consist of hostnames, IP addresses, GitHub repositories, Snyk targets, and AWS resources. Edgio registers assets using the following methods:
An asset is registered for each hostname, IP address, and GitHub repository defined as a seed.
Edgio uses seeds to determine which network segments will be scanned. Each hostname and IP address identified through this scan is also registered as an asset.
Each Snyk and Amazon GuardDuty seed may target an entire organization or system. Edgio will generate an asset for each Snyk target and AWS resource associated with those configurations.
Each Tenable Nessus and Tenable Security Center seed may target all or specific folders or repositories associated with an instance. Edgio will generate an asset for each folder or repository associated with those configurations.
Exposures: By default, Edgio scans your network for:
Common Vulnerabilities and Exposures (CVE). A CVE represents a known security vulnerability or exposure for a software package.
Common Weakness Enumeration (CWE). A CWE identifies a common software or hardware weakness that can potentially introduce a security vulnerability.
Open ports.
TLS issues.
Response header violations. For example, a required header may be missing or it can assigned an invalid value.
Additionally, Edgio can pull vulnerabilities identified by GitHub, Snyk, Amazon GuardDuty, Tenable Nessus, or Tenable Security Center.
Protections: Edgio identifies the security solutions that are protecting the assets associated with the scanned network segment.
Technologies: Edgio identifies the software and services used by the assets associated with the scanned network segment.
Rules: Determines how vulnerabilities and exposures are detected and handled.
Attack Surface Management identifies your assets, exposures, protections, and technologies by scanning your network. The network segment that will be scannned and what will be identified varies according to the seeds defined within the collection being scanned.
Once your network has been scanned, you should review and mitigate your exposures.
A collection represents the segment(s) of your network that will be scanned for vulnerabilities.
Each collection must contain at least one seed. Use one or more seed(s) to:
Define a domain, an IP address, or a range of IP addresses scope that will be scanned.
Define a GitHub repository from which security vulnerabilities identified by GitHub will be pulled. These vulnerabilities are identified through Dependabot, code scanning, and secret scanning.
Define a Snyk instance from which security vulnerabilities will be pulled.
Define an Amazon GuardDuty instance and the region(s) from which findings will be pulled.
Define a Tenable Nessus instance from which Edgio will import assets and vulnerabilities from each folder discovered in the latest scan.
Restrict vulnerability and asset discovery to specific folders by clearing the Discover assets from all folders option and then selecting the desired folders.
Multiple Nessus instances within your network can be added to the same organization. Edgio will automatically remove duplicate assets and vulnerabilities.
Define a Tenable Security Center instance from which Edgio will import assets and vulnerabilities from each repository discovered in the latest scan. Restrict vulnerability and asset discovery to specific repositories by clearing the Discover assets from all repositories option and then selecting the desired repositories.
Once you have defined the desired seed(s), Edgio will scan your network for exposures and retrieve vulnerabilities identified by GitHub and Snyk. This allows Edgio to generate a consolidated list of vulnerabilities and exposures that provides full visibility into your organization’s attack surface.
You may create, modify, and delete collections. Finally, you can reset a collection to delete all exposures, assets, and technologies associated with it.
Edgio limits the number of collections that can be created. This limit is enforced on a per organization basis.
To create a collection
Load the Create a Collection pane.
From the Edgio Console, select the desired organization.
From the Security section, click Attack Surface.
Perform one of the following steps:
Initial Collection: Click + Create a Collection.
Subsequent Collections: From the left-hand pane, select Collections and then click + Create Collection.
From the Name option, assign a name to this collection.
Optional. From the Description option, provide a brief description for the purpose of this collection.
Optional. Define a schedule for when Edgio will scan your network.
Mark each day of the week on which Edgio will scan your network.
Select the time (UTC) at which the scan will start.
Optional. Define when notifications will be sent.
Scan Start: Require Edgio to notify you when it starts scanning your network by marking the Send email on scan start option. Disable this notification by clearing this option.
Scan Start: Require Edgio to notify you when it completes a network scan by marking the Send email when a scan completes option. Disable this notification by clearing this option.
Scan Start: Require Edgio to notify you when it detects new exposures or if existing exposures have been resolved by marking the Only send when new exposures are found or existing exposures are resolved option. Disable this notification by clearing this option.
If you have enabled at least one notification, then you should define the set of users that will be notified. From the Recipients section, click within the option and then select the desired user. Repeat as needed.
Click Create Collection.
Once you have created a collection, you should add seeds that define the segment of your network that will be scanned.
To add seeds to a collection
Load the Collections page.
From the Edgio Console, select the desired organization.
From the Security section, click Attack Surface.
From the left-hand pane, select Collections.
Click on the desired collection.
Click + Add a Seed.
From the Type option, select the type of seed (e.g., domain, IP address, or GitHub repository) that will be added.
Perform one of the following steps:
Domain: From the Seed option, type the name of the domain (e.g., example.com) that will be scanned.
GitHub Repository:
From the Seed option, type the repository path (e.g., edgio-docs\edgio-docs). A repository path typically identifies the owner of the repository (e.g., an organization or a user), a slash, and then the name of the repository.
From the GitHub Personal Access Token option, provide a personal access token through which Edgio will access your repository.
From the Linked hostnames option, type one or more hostname(s) associated with the specified branches. Use a comma to delimit each hostname.
IP Address: From the Seed option, type the desired IP address.
IP Address Range: From the Seed option, type the desired IP address range or IP address block. Use CIDR notation.
Sample IP address range:192.0.2.10-100
Sample IP address block:192.0.2.0/24
Snyk:
In the Name option, type a descriptive name.
In the Organization id option, type your Snyk organization’s internal ID.
In the API Key option, type your Snyk organization’s API key.
Amazon GuardDuty:
In the Name option, type a descriptive name.
In the Access Key ID option, type your Amazon GuardDuty access key ID.
In the Secret Access Key option, type your Amazon GuardDuty secret access key.
In the Regions option, type the regions for which findings will be pulled.
Tenable Nessus:
In the Name option, type a descriptive name.
In the Nessus Instance URL option, type the full URL for a Nessus instance that is accessible by Edgio. Instances hosted on a private network that require a VPN connection or proxy servers are unsupported.
Example:https://my-tenable-ns.com:8834
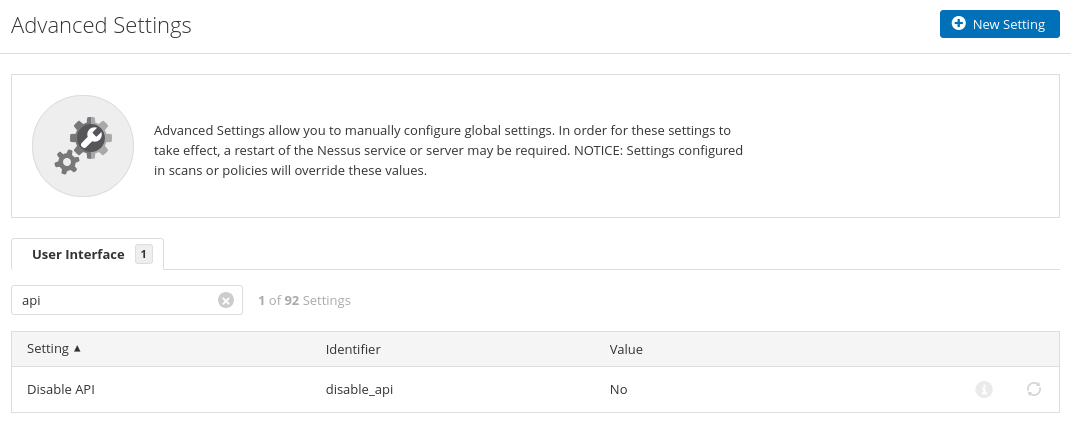
Make sure that the REST API is enabled on your Nessus instance.
Enable the REST API through the Nessus web interface (Settings > Advanced > User Interface) by setting the Disable API option to No and then restarting the Nessus service.
If you are using a self-signed certificate, clear the Verify Cert option to disable certificate verification. This configuration is discouraged for production environments.
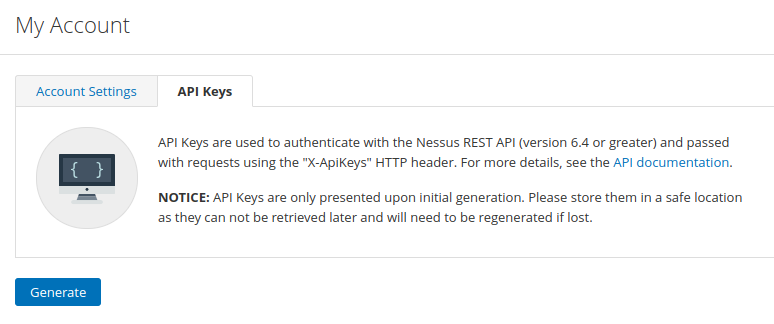
In the Access Key option, paste your Nessus access key.
Generate access and secret keys through the Nessus web interface (My Account > API Keys > Generate).
See the Nessus documentation for more details.
In the Secret Key option, paste your Nessus secret key.
Make sure that the user associated with the access key has permission to access the Nessus API and the View scan permission.
See the Nessus User Permissions for more information.
Click on Test Connection to verify that Edgio can connect to your Nessus instance with the given credentials.
By default, Edgio will discover assets and vulnerabilities from all available folders in your Nessus instance. Restrict vulnerability and asset discovery to specific folders by clearing the Discover assets from all folders option and then selecting the desired folders.
Edgio supports self-hosted or managed instances of Tenable Nessus 6.4 or later. Products with Nessus-compatible APIs such as Tenable Vulnerability Management (formerly Tenable.io) can also be configured under the Tenable Nessus seed. However, these products are not fully supported and import may fail due to API limitations. Contact your account manager to find out whether your instance is compatible with Edgio.
Tenable Security Center:
In the Name option, type a descriptive name.
In the Tenable Security Center URL option, type the full URL for a Tenable Security Center instance that is accessible by Edgio. Instances hosted on a private network that require a VPN connection or proxy servers are unsupported.
Example:https://my-tenable-sc.com
Make sure that API key authentication is enabled on your Security Center instance.
Enable API key authentication in the Security Center web interface (System > Configuration > Security > Authentication Settings) by clicking on the Allow API Keys option and then saving this change.
See the Security Center Authentication documentation for more details.
If you are using a self-signed certificate, clear the Verify Cert option to disable certificate verification. This configuration is discouraged for production environments.
In the Access Key option, paste your Security Center access key.
Generate access and secret keys through the Security Center web interface (Users > API Keys > Generate).
See the Security Center documentation for more details.
In the Secret Key option, paste your secret key.
Make sure that the user associated with the access key has been assigned the Vulnerability Analyst role or higher. This user should also have sufficient permission to access the Security Center API.
See the Security Center User Roles for more information.
Click on Test Connection to verify that Edgio can connect to your Security Center instance with the given credentials.
By default, Edgio will discover assets and vulnerabilities from all available repositories in your Security Center instance. Restrict vulnerability and asset discovery to specific repositories by clearing the Discover assets from all repositories option and then selecting the desired repositories.
Edgio supports self-hosted or managed instances of Tenable Security Center 5.13 or later. Contact your account manager to find out whether your instance is compatible with Edgio.
Click Create Seed.
To modify a collection
Load the Collections page.
From the Edgio Console, select the desired organization.
From the Seeds section, click on the desired seed.
Make the desired changes.
Click Apply Changes to save your changes.
Delete a seed:
From the Seeds section, click on the desired seed.
Click Delete.
When prompted, click Delete Seed to confirm the deletion.
Update the name, description, schedule, or notifications:
Click Edit Collection.
Perform the desired changes.
Click Apply Changes to save your changes.
To delete a collection
Load the Collections page.
From the Edgio Console, select the desired organization.
From the Security section, click Attack Surface.
From the left-hand pane, select Collections.
Click the (Delete) icon next to the collection that should be deleted.
When prompted, confirm the deletion by clicking Delete.
To reset a collection
Resetting a collection permanently deletes all exposures, assets, and technologies associated with it. Once a collection has been reset, this information will be cleared until you scan your network again.
Load the Collections page.
From the Edgio Console, select the desired organization.
From the Security section, click Attack Surface.
From the left-hand pane, select Collections.
Click on the desired collection.
From the Reset Collection section, click Reset Collection.
Once you have created a collection and added at least one seed to it, start scanning your network by viewing that collection and then clicking Scan Now. Edgio will discover and scan all of the assets associated with the seeds in the collection. Monitor the progress of the scan from the Scans section.
Key information:
Your initial scan will detect and scan all of your assets. It will also place your assets under management until your organization’s limit is reached. If the number of detected assets exceeds your organization’s limit, then Edgio prioritizes hostnames over IP addresses.
For example, let’s assume that your organization has 100 hostnames and 600 IP addresses. If your organization’s limit is 500 assets, then Edgio will place 100 hostnames and 400 IP addresses under management.
Create or modify rules to create custom exposure detection and to determine whether exposures are created from findings discovered from scanned assets.
By default, Edgio performs superficial penetration testing to assess whether your assets are protected by a Web Application Firewall (WAF). For example, this testing will assess whether those assets are susceptible to cross-side scripting (XSS) or SQL injection. Disable this type of testing by clearing the Enable WAF detection setting from the Attack Surface Management section of your organization’s Settings page.
Edgio may identify unreachable assets when it scans your network. Perform the following steps to view a list of these assets:
Open the desired scan.
From the Tasks section, find the Status option. Select Asset Unreachable and then click Update.
To scan your network
Verify that your network’s firewall allows the following IP addresses:
13.220.136.205
234.236.88.192
352.3.81.5
Load the Collections page.
From the Edgio Console, select the desired organization.
Rules determine the type of exposures that will be created based off of:
Findings: Edgio scans your organization’s managed assets for known vulnerabilities to discover findings. Rules determine the types of exposures that Edgio will create based on these findings.
Custom Criteria: Configure a rule to add custom checks to a scan.
For example, a rule can create an exposure when it detects a response header with a specific value.
Rules allow you to:
Determine whether exposures are reported when specific conditions are met.
Customize the severity, priority, and assignee when specific conditions are met.
Specify which ports are scanned on a per asset basis.
Key information:
Edgio will not create an exposure for a hostname or IP address unless a finding matches at least one rule that is configured to create an exposure.
For GitHub repositories, Edgio pulls vulnerabilities identified by GitHub.
For Snyk, Edgio pulls vulnerabilities identified by Snyk.
For Amazon GuardDuty, Edgio pulls findings identified by Amazon GuardDuty for the regions defined within the seed.
Edgio provides a default rule set that you can use as a starting point. This rule set creates exposures for all findings.
Rules are processed in the order that they are listed. If a finding satifies multiple rules, then all of those rules are applied to it. Edgio resolves conflicts by giving precedence to the rule that is closest to the bottom of the list.
For example, if both rules #4 and #6 apply to a finding, then precedence is given to rule #6.
Determine whether a rule applies to a finding by defining one or more condition(s).
To create a rule
Load the Rules page.
From the Edgio Console, select the desired organization.
From the Security section, click Attack Surface.
From the left-hand pane, select Rules.
Click + Create Rule.
Define one or more condition(s) that identify the findings to which this rule will be applied.
Select a type of condition.
Define when that condition will be met.
Severity: Select an operator and a number from 0 (lowest) to 10 (highest) that represents the potential impact of an exposure.
Example:Severityis greater than3.7
CVE ID: Select an operator that defines the relationship with a CVE ID.
TLS SNI Hint Mismatch: This condition is satisfied when the request’s SNI hint does not match a value defined within the asset’s TLS certificate.
Repeat the previous step as needed. If you have defined multiple conditions and would like to make them all mandatory, then you should select All of from the When Any of the following finding criteria are met option.
From the Action option, choose how findings that satisfy this rule will be handled.
Create an exposure with following values: Select this option to create an exposure.
Optional. From the Assign user option, select a user to which this exposure will be assigned by default.
Optional. From the Assign priority option, select the default priority that will be assigned to this exposure.
Optional. From the Assign severity option, select the default severity that will be assigned to this exposure.
Optional. From the Assign summary option, provide a brief summary of this finding. You may include variable data, such as $summary, $cve, or $hostname.
Don’t create an exposure: Select this option if an exposure should not be created for findings that match this rule.
If another rule creates exposure, assign values: Select this option to override the user, priority, and severity assigned to a previously discovered exposure.
Restrict this rule by collection. From the Collections option, select one of the following options:
Applies to all collections: Applies this rule to all collection.
Only applies to specific collections: Applies this rule to the selected collections. Click directly below this option and select each desired collection.
Applies to all collections except: Applies this rule to all collections except for those that have been selected. Click directly below this option and select each collection to which this rule will not be applied.
Restrict this rule by asset. From the Assets option, select one of the following options:
Applies to all assets: Applies this rule to all assets.
Applies to assets matching any of the following criteria: Applies this rule to a finding that matches at least one condition. Define one or more condition(s) for identifying assets.
Applies to assets matching all of the following criteria: Applies this rule to a finding that matches all specified conditions. Define one or more condition(s) for identifying assets.
Define a condition by performing the following steps:
Click + Add Criteria.
Select the type of asset (e.g., hostname or IP address).
Select an operator that defines the relationship with the value specified in the next step.
Specify a value.
Sample condition:Hostnamematches.*(example.com)
Determine whether to stop processing a finding when this rule is satisfied.
Allow subsequent rules to process by setting the Exit on match option to (off).
Stop processing when this rule is satisfied by setting the Exit on match option to (on).
From the Rule description option, type a brief description for this rule.
From the Enabled option, determine whether this rule will be enabled.
Click Create Rule.
To enable or disable a rule
Load the Rules page.
From the Edgio Console, select the desired organization.
From the Security section, click Attack Surface.
From the left-hand pane, select Rules.
Click on the desired rule.
From the Enabled option, determine whether this rule will be:
Enabled: It should look like this:
Disabled: It should look like this:
Click Apply Changes.
To modify a rule
Load the Rules page.
From the Edgio Console, select the desired organization.
From the Security section, click Attack Surface.
From the left-hand pane, select Rules.
Click on the desired rule.
Make the desired changes.
Click Apply Changes.
To scan ports without creating exposures
This procedure assumes that you have not deleted or modified the Scan common remote access ports rule.
Load the Rules page.
From the Edgio Console, select the desired organization.
From the Security section, click Attack Surface.
From the left-hand pane, select Rules.
Click on the Scan common remote access ports rule.
From the Action option, select Don't create an exposure.
Click Apply Changes.
Subsequent scans will continue to scan open ports for technologies and protections. However, exposures will not be generated from those scans.
To delete a rule
Load the Rules page.
From the Edgio Console, select the desired organization.
From the Security section, click Attack Surface.
From the left-hand pane, select Rules.
Click the (Delete) icon next to the rule that should be deleted.
When prompted, confirm the deletion by clicking Delete.
Exposures represent the vulnerabilities and misconfigurations that Edgio has discovered in your organization’s attack surface. Exposures are automatically created and updated as Edgio scans your organization’s managed assets.
Key information:
You may create or modify a rule to prevent exposures from being created for scanned hostnames and IP addresses.
ID: An identifier comprised of the collection name and an incrementing number.
Summary: A brief description of the exposure.
Asset: The asset (e.g., a hostname, IP address, or seed) on which the exposure was detected.
Severity: The potential impact of an exposure is reported as a number from 0 (lowest) to 10 (highest).
Priority: The priority of the exposure (Low, Medium, High, or Critical). Use priority to indicate the urgency with which the exposure should be addressed.
Assignee: The user or team that is responsible for addressing the exposure.
Status: The status of the exposure: Valid values are:
New: The exposure has been created, but has not been reviewed.
Acknowledged: The exposure has been reviewed.
Resolved: The exposure has been addressed.
Mitigated: The exposure still exists, but the risk has been reduced.
Muted: The exposure has been muted, optionally until a specific date.
Ignored: The exposure has been ignored.
Technology Version: Optional. The specific version of the technology that is associated with the exposure.
CVE: Optional. The CVE that is associated with the exposure.
Comments: Optional. Users can add comments to exposures to provide additional context or information.
Edgio Attack Surface Management scans your network to detect the internet-facing assets that make up your organization’s attack surface. Edgio places these assets under management until your organization’s limit is reached. Although your intial scan detects technologies, protections, and exposures for all assets, subsequent scans are restricted to managed assets.
Edgio limits the total number of assets that are eligible for scanning. This limit is enforced on a per organization basis.
To toggle an asset’s management status
Load the Assets page.
From the Edgio Console, select the desired organization.
From the Security section, click Attack Surface.
From the left-hand pane, select Assets.
Find the desired asset.
From the Under Management column, determine whether Edgio may scan it for exposures.
Edgio identifies the security solutions that are protecting the assets associated with the scanned network segment. As part of this identification process, Edgio will simulate the following attacks on managed assets to determine if a security solution blocks them:
SQL Injection
Cross Site Scripting (XSS)
Command Injection
Local File Inclusion (LFI)
XML External Entity Injection (XXE)
These attacks are considered benign and will not harm your organization’s assets.
Edgio Attack Surface Management will discover and track the technologies that are associated with your organization’s assets. Technologies are automatically created and updated as Edgio scans your organization’s assets.
View the technologies used by your network by navigating to the Technologies page under the Attack Surfaces section.
Once you have scanned your network, Edgio generates an executive-level security assessment of your organization’s attack surface. You may customize this report to meet your organization’s business needs. This report uses standard Markdown syntax.
To modify your report
Load the Report page.
From the Edgio Console, select the desired organization.
From the Security section, click Attack Surface.
From the left-hand pane, select Report.
Click Edit.
Make the desired changes.
You can reset the report to the default content by clicking Revert to Default.
Click Save Changes.
All of your collections use the same report, regardless of whether you are filtering by collection. Filtering by collection tailors that report to the selected collection(s). This allows you to view and download collection-specific reports.
To download your report
Load the Report page.
From the Edgio Console, select the desired organization.
From the Security section, click Attack Surface.
From the left-hand pane, select Report.
Optional. Filter the report’s data by selecting one or more collections.
Click Download PDF to download the report as a PDF.