Introduction
Edgio MMD Live includes a capability that allows an event that is being streamed live to be automatically recorded to Edgio Origin Storage for later playback as a Video on Demand (VoD) asset. Customers can configure the recording of single live events, recurring live events, or continuous streaming for later VoD playback.
Live to VoD simplifies the process of making live-streamed events available for later re-use as on-demand video assets. Anyone that delivers live video streams and needs to repurpose live content for VoD playback will benefit from using Live to VoD Recording.
With Edgio’s Live to VoD Recording, you can:
- Repurpose live content as VoD assets to increase viewership and monetization.
- Have a simplified and automatic recording process that creates recordings with minimal human intervention.
- Have a library of recorded assets that can be delivered to audiences anywhere, on any device.
- Have flexibility in scheduling the recording of live events.
- Develop a workflow to deliver content directly and quickly from Origin Storage.
Edgio’s Live to VoD recording feature enables an integrated workflow from live streaming to VoD asset capture to VoD playback. The VoD asset is captured directly to Edgio Origin Storage within minutes of the end of the event without having to cross the internet to an outside cloud storage vendor.
Customers can deliver captured files through the Edgio CDN using MMD On-Demand. They can upload the files to their Limelight Video Platform (LVP) account and use LVP to encode and playback the captured recording with the LVP HTML Player. The recording files may also be downloaded using the Edgio Origin Storage features. (See Origin Storage documentation.)
Edgio’s Live to VoD solution provides a powerful scheduling capability that gives customers total flexibility when recordings will be made. With a simple set of controls, the recordings can be made continuously (24/7), scheduled with beginning and end times, or recorded on a recurring schedule (for example, every Saturday and Sunday from 8 am to noon). Also, the schedules can be set to local time to adjust to Daylight Saving Time automatically.
The Live to VoD service is available to MMD Live customers world-wide. Contact your Edgio representative to find out if you can add Live to VoD to your MMD Live service.
More about Live to VoD
Live to VoD is available for both transcode and transmux type slots.
You can use the Live to VoD service on slots that were created before you purchased the service.
The service is available to both existing and new MMD Live customers.
The recordings from Live to VoD may be used as input to Edgio MMD OD service for on-demand playback.
Configuring Live to VoD
Adding Live to VoD to your MMD Live account is easy - just contact your Edgio representative.
The configuration options to set up Live to VoD include:
- Your Origin Storage account information. You must have an Origin Storage account to store the Live to VoD service’s recording files output. Once you set up your account, all your recordings will be stored and made accessible to you in your Origin Storage account.
- The Origin Storage Folder. A specific folder will hold all your recordings from Live to VoD. The specific folder will keep them separated from your other Origin Storage files and make them easily identifiable. You can move them from this folder if you wish, but this folder will always be the place the look for your recordings.
- Notification Email Address. Upon completing a recording and the placement of that recording in your Origin Storage account, an email will be sent to the notification email address. The email will contain the details of the recording.
How Live to VoD Works
Live to VoD uses the output of MMD Live to record and convert to MP4 files.
The process starts with your usual publishing of an RTMP stream from your encoder to the MMD Live ingest. No additional configurations are needed with your MMD Live service - you publish to MMD Live just as before.
Live to VoD captures the MMD Live service output and converts the outgoing stream to MP4s. At times you configure using the Live to VoD scheduling interface if you schedule a recording and are not streaming during the entire scheduled time, no problem! As long as your schedule covers a set amount of time, it will capture whatever and whenever you stream during that scheduled time.
If you include CEA-608 caption data in the video transport stream, Live to VoD will capture the video content stored within the output MP4 files.
The time between the end of the capture of the chunks (your scheduled end time) and the availability of the MP4s will vary based on the duration of the recording. On average, you can expect that MP4s will be available no longer than 30 minutes after the scheduled end time, though most recordings will be available much sooner than that.
MMD Live can deliver different bitrate and resolution versions of your video; Live to VoD can convert either just the highest bitrate or all the bitrates, according to how you configure the schedule.
Stream Availability
If streaming stops and then starts again in the middle of a recording schedule, the recording will stop and start again based on the presence of the incoming stream. Live to VoD will not record if there is no incoming stream.
Failover Redundancy
Recordings are captured from the output of the MMD Live service. If you publish to both primary and backup MMD Live ingests, your recording will be available even upon interruption of the primary stream.
To ensure your recording can proceed smoothly in case of an interruption of your primary stream, the Live to VoD system enforces a timecoding of each HTTP chunked output of MMD Live. The timecoding allows the recording system to combine HTTP outputs when switching between the MMD Live primary and backup streams.
The Live to VoD recording system also employs a high availability redundant system with failover capability within the recording system itself.
Restrictions
In any given slot, you can only make one recording at any point in time. That is, you may not schedule overlapping times to record a stream. Only authorized users can create, edit, cancel and remove recordings.
Recording Length and Renditions
All recordings are optimized for HTTP streaming and progressive download. MP4s are written with the moov atom at the beginning of the file to enable easy management and processing. Recording lengths may be as short as 5 minutes or as long as four hours to accommodate longer recordings, such as a sporting event.
During the setup of a recording schedule, customers can opt to record just the highest bitrate of a live stream. If they want to archive a copy of the live stream suitable for MMD OD streaming, they can record all the renditions (in other words, bitrates).
Closed Captions
If your RTMP stream includes CEA-608 captions, MMD Live will convert them to WebVTT captions within the chunked streaming output. The captions data will also be maintained within the video stream itself. When Live to VoD captures the output of MMD Live and converts it to MP4 files, the captions data within the video stream will be stored within the MP4 files.
Accessing Schedule Functionality
To access scheduling functionality, begin by clicking Configure in the left navigation panel in the Control portal. Then click Live Streaming. A list of slots for your account appears:
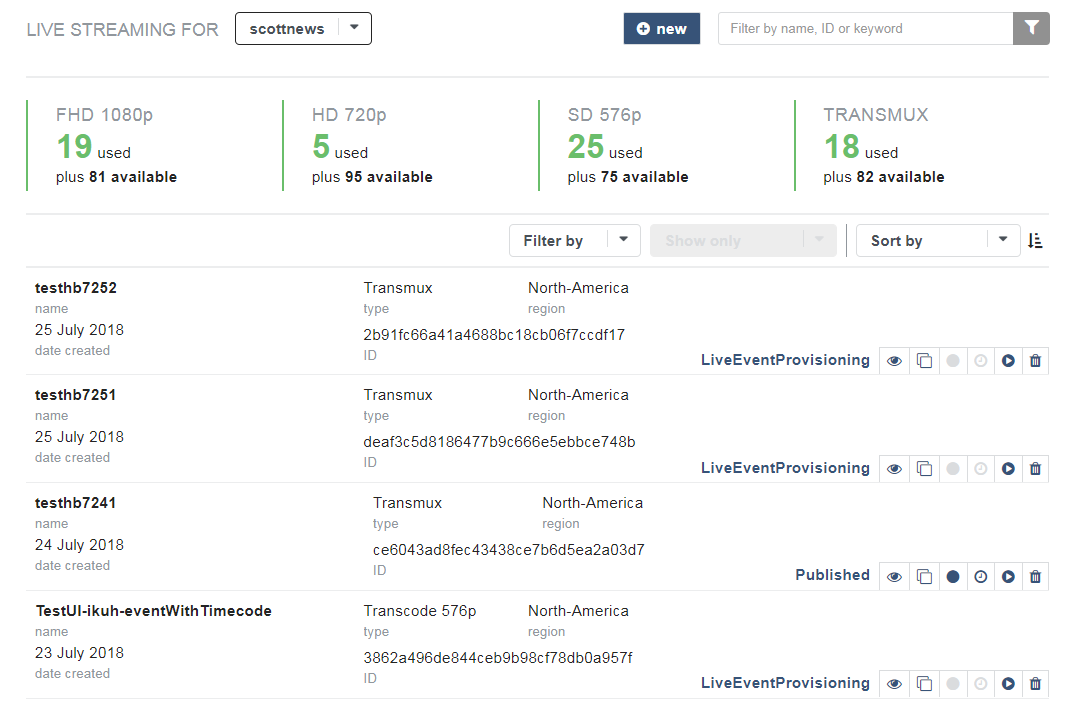
To access a slot’s schedule, locate the desired slot and click the Schedule icon on the right side of the slot’s row:

If there are previously configured recordings for the slot, they are listed in the Recording Schedule dialog:
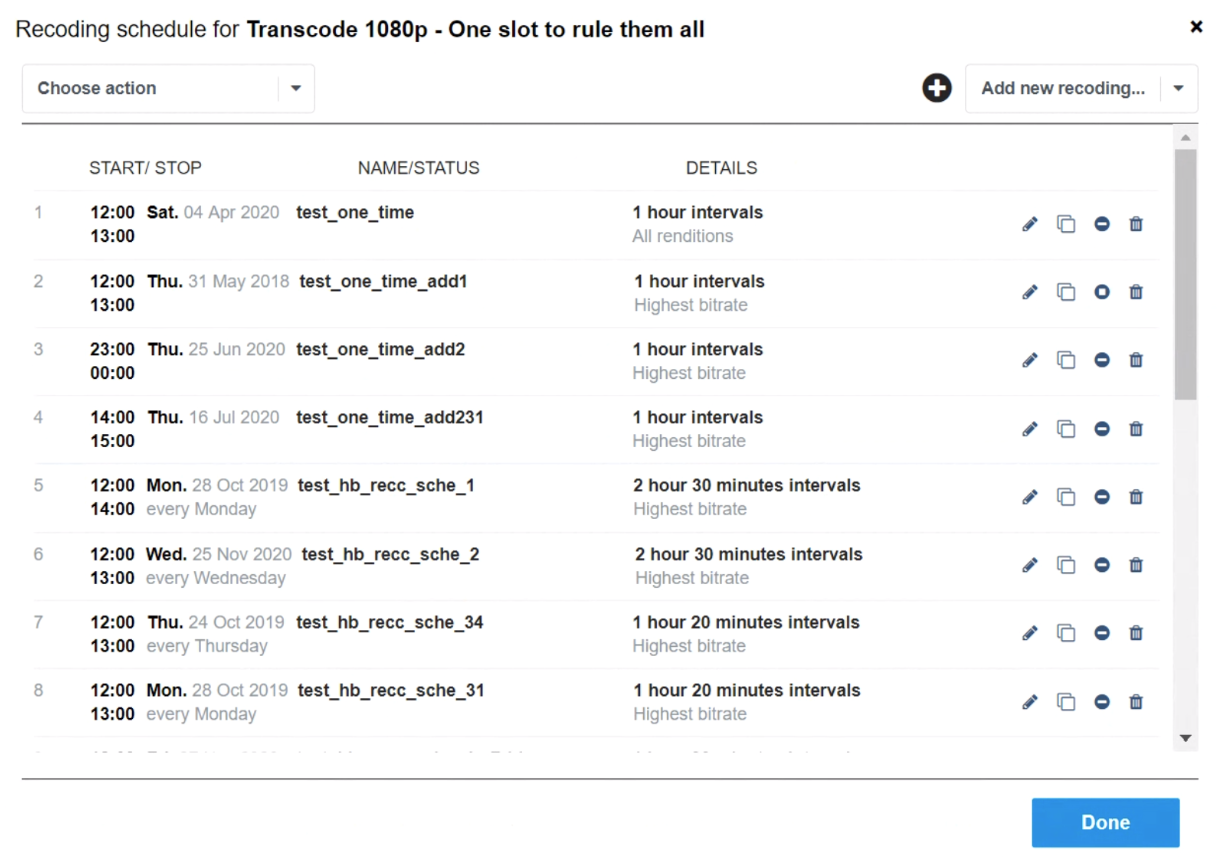
From this dialog, you can perform tasks described in the following sections:
As a convenience, icons for editing, cloning, canceling, and removing a recording are disabled if that functionality is not available at the time.
Filtering the List of Recordings
Recordings completed will remain in the schedule view of Live to VoD but will be indicated as completed. You can filter the list by clicking an option from the drop-down menu above the list of recordings:

- Clear completed recordings: hides completed recordings but does not delete them
- Show all recordings: shows completed, in-progress, and future recordings
Scheduling Recordings
Other than the “record now” type, each recording can be configured to record into files at 5-minute increments up to a maximum of 4 hours. “Record now” recordings default to 3-hour increments.
How to Make a Recording
There are four ways to make recordings:
- Use the “record now” feature on the MMD Live slot list to start immediately
- Create a one-time event schedule to record in the future for a set duration
- Create a recurring recording schedule to record on the same day and time every week for a set duration
- Record continuously, 24/7
- As an alternative to creating a recording, you can clone and modify an existing recording. See Clone a Recording for details.
- You cannot schedule recordings that overlap in time.
- If there is a recording already in progress, you cannot start a new recording.
Record Now
To start recording immediately, close the Recording Schedule dialog, then click the Record icon on the row containing the slot:

The icon blinks red once, and then after a pause, the icon becomes solid red to indicate that the recording has started.
A new row is added to the slot’s recording schedule (click the Schedule icon to view the schedule):
- Record increments of
- Name: The recording’s name is ‘record now_’ + the timestamp when the recording started.
- Record all renditions
When the icon is red, it means the ‘Record Now’ function is continuing to record. To stop recording, click the icon once. It may take a few seconds for the recording to wrap up and stop.
‘Record Now’ may require a few seconds to start and stop the recording workflow.
Other Recording Options
To access other recording options, choose a slot, then click the Add new recording… drop-down menu:
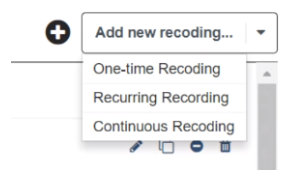
Then click the desired option:
One-time Recording
A one-time recording automatically records all renditions (i.e., bitrates).
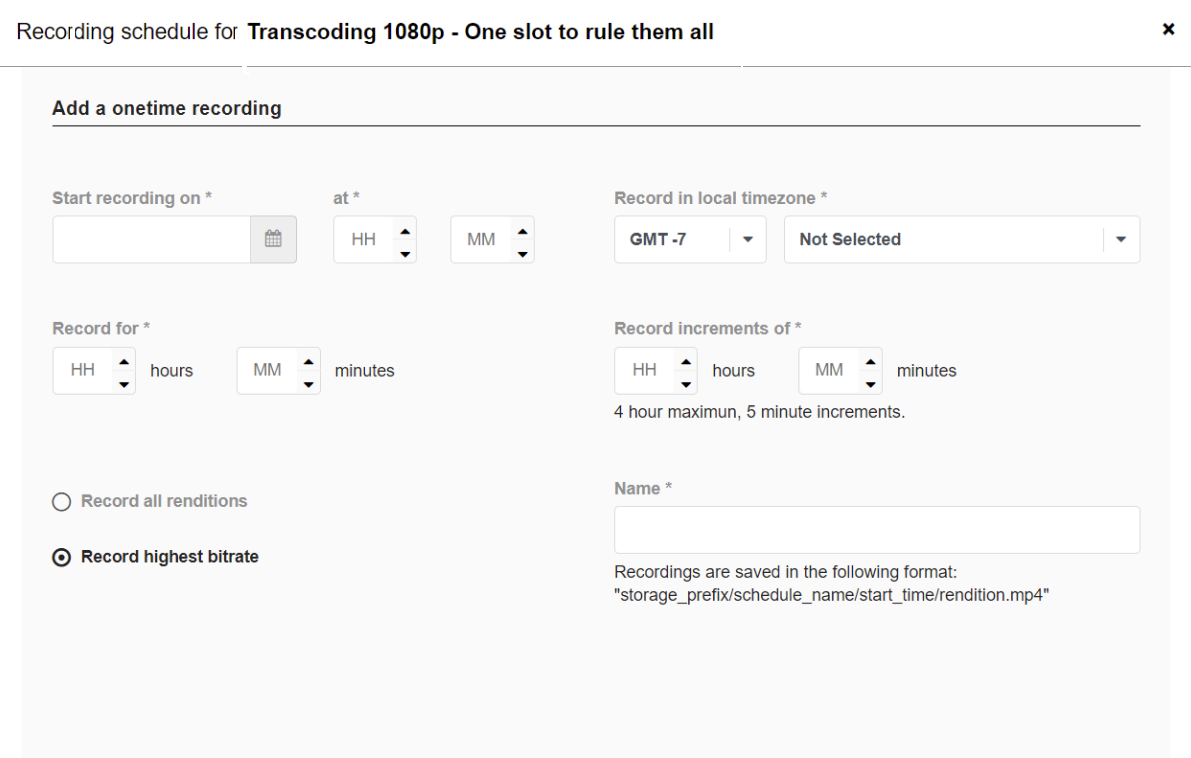
Configure the desired settings using the information in Fields in the Recording Schedule Dialog.
Click Add to save the recording.
Recurring Recording
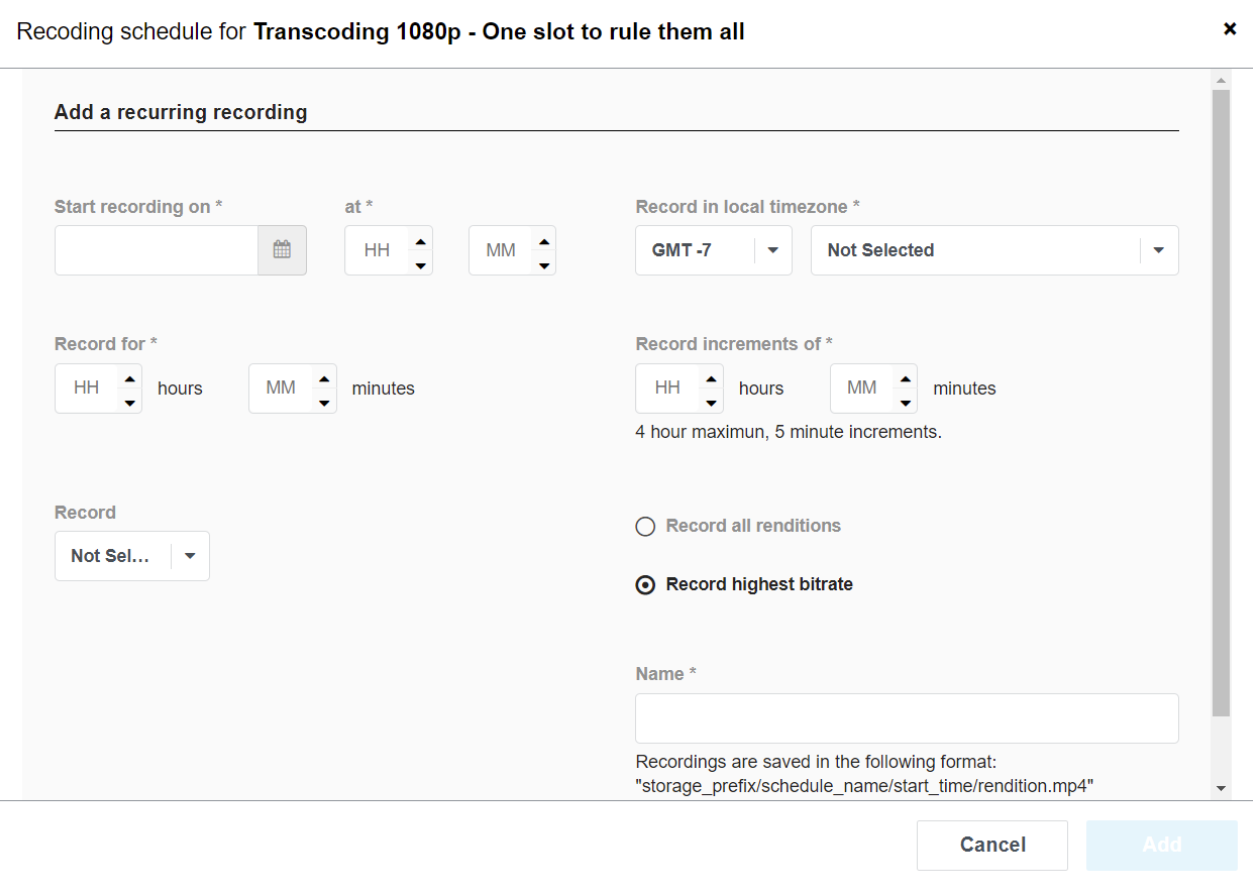
Configure the desired settings using the information in Fields in the Recording Schedule Dialog.
Click Add to save the recording.
If you configure the recurring recording to happen on multiple days, you will see a unique entry for each day’s recording schedule after you save the schedule. You can then edit, cancel, delete or clone these entries independently of each other. Canceling a recurring recording requires the canceling of each entry.
Continuous Recording
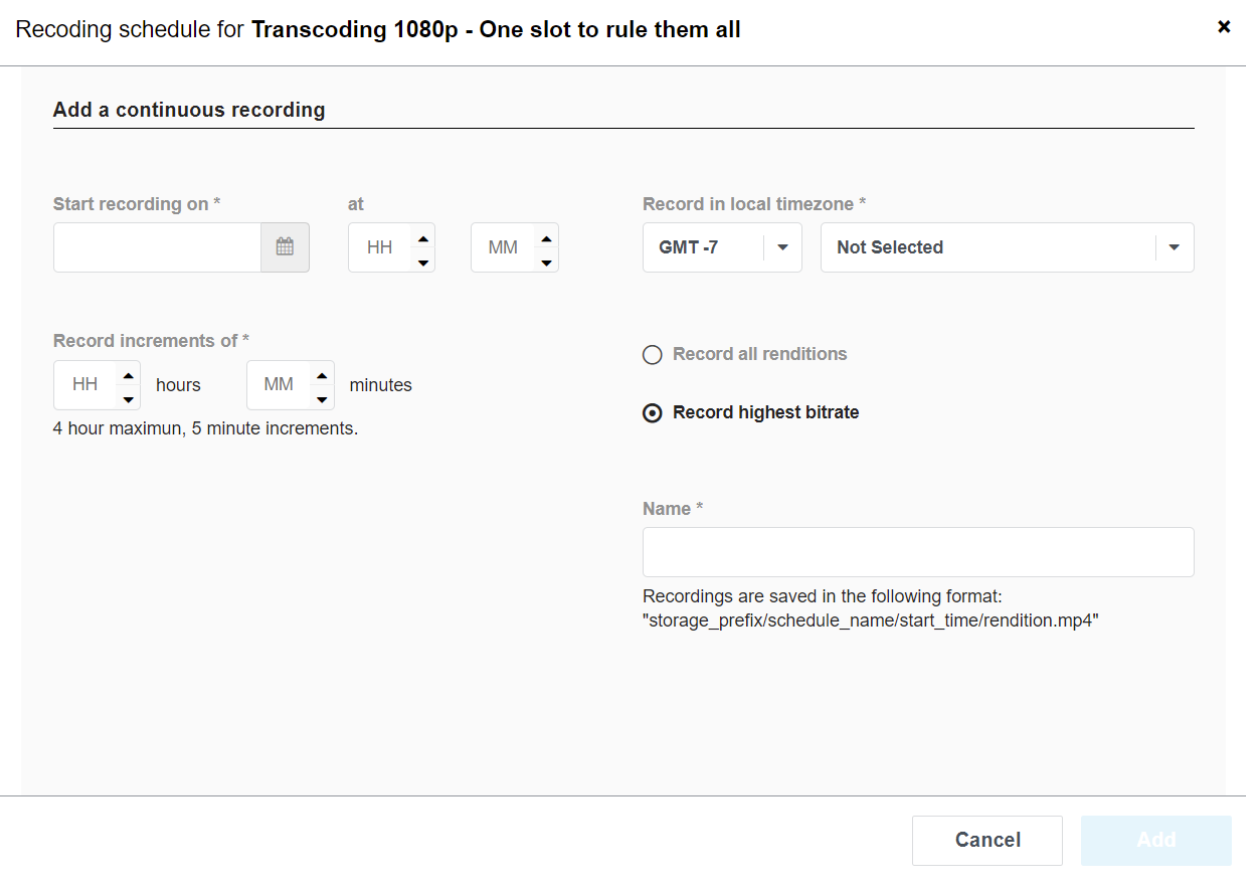
A continuous recording records a stream continuously. You cannot set an end time on a continuous recording; if you want to stop a continuous recording, you must cancel it. If your stream starts and stops, a continuous recording schedule will record during your streaming.
Configure the desired settings using the information in Fields in the Recording Schedule Dialog.
Click Add to save the recording.
If you create a continuous recording schedule, the system will not let you create another kind of schedule before the continuous recording begins, even if the continuous recording is scheduled to start in the future. This prevents a schedule from overlapping the continuous recording.
Editing a Recording
To edit an existing recording, click the Edit icon on the right side of the recording row in the Recording Schedule dialog:

Configure the desired settings using the information in Fields in the Recording Schedule Dialog.
You can modify a schedule before it has begun recording.
- You can modify a schedule after it has begun recording, but you can only lengthen or shorten it.
- You cannot edit a canceled recording.
- You cannot change the day on a recurring schedule. To record on a different day, create a new recurring schedule for the new day.
- You can modify a schedule after it has begun recording, but you can only lengthen or shorten it.
- You cannot edit a canceled recording.
- You cannot change the day on a recurring schedule. To record on a different day, create a new recurring schedule for the new day.
Cloning a Recording
As an alternative to creating a new recording, you can clone an existing recording by clicking the Clone icon on the right side of the recording’s row in the Recording Schedule dialog:

The cloned recording opens in the Recording Schedule dialog.
Configure the desired settings using the information in Fields in the Recording Schedule Dialog.
You must change the name of the recording at a minimum, or you will not save it.
Canceling a Recording
When you cancel a recording, the system unschedules the recording and makes it non-editable but does not remove it from the Recording Schedule dialog (see Removing a Recording from the Schedule).
Use either of the following methods to cancel a recording:
Click the Edit icon on the right side of the recording’s row in the Recording Schedule dialog, then click the Cancel recording button at the bottom of the dialog.
Click OK in the confirmation dialog.
If the recording is in progress, it will end as soon as possible after you cancel, typically within a minute or two. The recording’s status becomes ‘Cancelled’ in the Recording Schedule dialog.
Removing a Recording from the Schedule
Schedules that have been completed or canceled remain in the Recording Schedule dialog for your historical reference. You can filter the view of the dialog to show only active recordings. You can also remove a schedule from the dialog completely.
Before you remove an unfinished recording, you must cancel it.
To remove a recording from the schedule, click the Remove icon on the right side of the recording row in the Recording Schedule dialog:

Then click OK in the confirmation dialog.
The system completely removes the recording schedule from the Recording Schedule dialog.
Removing a recording schedule does not remove any completed MP4 files. MP4 files made from your live stream may only be deleted using the Origin Storage interfaces. (See Origin Storage documentation.)
Understanding Output Directory Structure
Recordings are saved to a specific directory within your Edgio Origin Storage account. This directory is set up when you are first configured for the Live to VoD feature.
That directory has sub-directories based on each of your recordings. MP4s are stored at the lowest level of the directory structure, with each rendition (in other words, bitrate) being a separate MP4 file.
The directory structure for recordings follows this pattern:
1<origin storage hostname>/2 |----><mmd live to vod folder>/3 |---><slot name>/4 |---><schedule name>/5 |---><increment start datetime>/6 |--><bitrate1.MP4>7 |--><bitrate2.MP4>8 |--><bitrate3.MP4>9 |--><bitrate4.MP4>
- Your
<mmd live to vod folder>name was chosen by your organization when your organization signed up for Live to VoD. The folder name usually begins with your account name. If you want to change the name, please contact your Account Manager. - The name you give to your schedule will be the folder that contains the recording files associated with that schedule.
- If your schedule has multiple increments (for example, a four-hour recording in 30-minute increments), each increment will have a separate folder with the MP4s for that increment stored within it.
- If your slot has multiple schedules with the same name, each schedule will have its entry under
<slot name>.
Access to your recordings is through the tools available with your Edgio Origin Storage account.
Use the Origin Storage tools to access your recordings. (See Origin Storage documentation.)
Disabling Live to VoD
Live to VoD is a feature of MMD Live that allows you to create recording schedules and then place recordings on your Origin Storage account.
If you delete a schedule or disable the Live to VoD feature on your MMD Live account, only the schedules will be deleted. All the completed MP4 files in your Origin Storage account will remain unaffected.
If your Live to VoD service is disabled:
- Schedules that are actively recording when the service is disabled will continue recording until their end time. Continuous recordings will continue until the current increment is completed, based on the recording schedule’s increment duration.
- Schedules planned to begin in the future will be canceled from the scheduling system.
- MP4s within your Origin Storage account will remain unaffected.
If your Live to VoD service is re-enabled after being disabled, schedules made before re-enabling the service will be visible in the Recording Schedule dialog as ‘finished’.
Fields in the Recording Schedule
This section describes fields in the Recording Schedule dialog for all recording types (One-time, Recurring, Continuous).
Fields are available for all recording types except where noted.
All fields are required; the Add button is only enabled after you configure all fields.
All fields are required; the Add button is only enabled after you configure all fields.
| Field | Description |
|---|---|
| Start recording on/at | Date and time to begin recording. You cannot create overlapping recordings on the same slot. |
| Record in local timezone | Timezone and sub-timezone in which recording should occur. Recurring schedules are based upon a geographic location’s time zone, so if that zone uses daylight saving time, your recording schedule will always be correct. For example, if you record every Sunday at 8 am and live in a time zone that changes based on daylight saving, your recording will still commence at 8 am on Sunday after daylight saving has changed the time within the zone. |
| Record for | The number of hours and minutes to record. You must set values in both fields. Not available in the ‘Continuous Recording’ option |
| Record in increments of | How often to start a new MP4 recording. You must set values in both fields. Each recording can be configured to record into any minute-length interval ranging from five minutes to 60 minutes (up to a maximum of four hours in length). Any scheduled recording must be a minimum of five minutes. For example, selecting 01 hours and 10 minutes means that a file will be produced every 1 hour and 10 minutes up to the recording duration. Not available in the ‘Continuous Recording’ option |
| Record (repeat interval) | Click either ‘every day’ or ‘every week’. If you choose ‘every week’, choose which days of the week you want to record. Only available in the ‘Recurring Recordings’ option |
| Record all renditions, Record highest bitrate | Indicate whether you want to record all renditions (in other words, bitrates) or only the highest bitrate according to the bitrates configured for the slot. Defaults to recording all renditions. See Configuration UI for additional information. |
| Name | Enter a descriptive name. There is no restriction on the number and type of characters. Duplicate schedule names are allowed. |

