The Origin Storage Console (the Console) is the user interface to Origin Storage that lets you perform many of the same tasks you might do through APIs, such as uploading files, creating directories and subdirectories, and so on. Depending on the speed of your internet connection and file size, you can populate your selected storage locations around the world in minutes.
If you already have an Origin Storage user account, you can access and use the Console; it mirrors your content. You can still access your Origin Storage account via the API.
If you are new to Origin Storage, you have the option to use either (or both) the Console or the Origin Storage API to store data in Edgio’s many geographic locations around the world that best meet your business requirements.
The Console is intended for ad-hoc work only and should not be part of normal CDN work flows. Whenever possible, we recommend that customers leverage the Origin Storage API due to its feature-rich ingest workflow and its superior performance.
Console Workspace

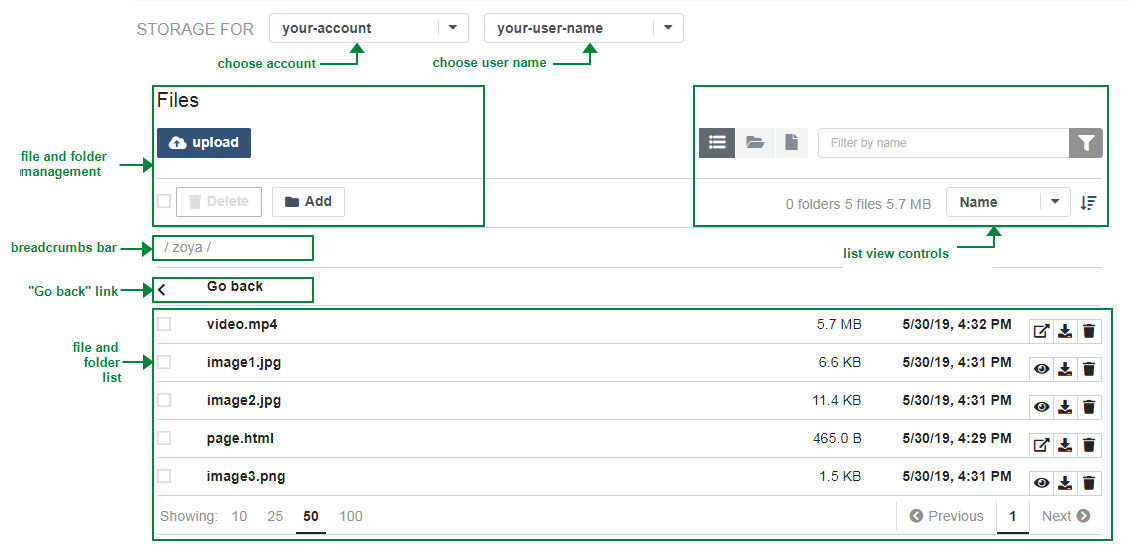
Navigate to Control > Manage > Origin Storage Console to access these controls:
- choose account / choose name: Allow you to choose the account and user name
- file and folder management: Contains controls for file- and folder- management tasks such as uploading and deleting files and creating folders. (You can also delete files while viewing them in the files and folders list.)
- list view controls: Allows you to filter the content of the file and folder list.
- breadcrumbs bar: Shows your place in the content structure and allows you to navigate by clicking path segments. Each segment in the breadcrumbs bar is a link to that segment in the folder structure. Click a link to move to that location in your content structure.
- Go back link: Visible only when you are one or more levels from the root folder, the link takes you to the previous path segment listed in the breadcrumbs bar.
- file and folder list: Shows files / folders contained in the folder currently shown in the breadcrumbs bar.
Viewing Content in the Files and Folders List
Before You Start
Select an account and user name if you have not already done so. Use the drop-down menus at the top of the workspace:

Filtering
You can filter the contents of the files and folders list by typing text in the Filter box in the top right corner of the page.
The filter applies only to the folder you are currently viewing as reflected in the breadcrumbs bar, and not the entire directory structure of your content as a whole.

The Console matches files and folders as specifically as possible to your filter. The Console applies the filter to file and folder names.
As you type, the Console modifies the files and folders list to match your filter.
Filtering is case insensitive.
Controlling List Content
Using the following list options icons in the top right corner of the page, you can view:
- files and folders
- folders only
- files only

Sorting
Using the sort drop-down and sort icon, you can arrange the contents of the files and folders list.

Choose a field to sort by in the sort dropdown:
- Name
- Date Uploaded
- File Size
For folders, Date Uploaded is the folder creation date.
Click the sort icon to toggle between ascending (default) or descending order.
Paging
Use the results per page links at the bottom of the page to control the number of items visible per page. The paging links allow you to page through the files and folders list by selecting the page number you want to view.

Working with Files
Before You Start
Select an account and user name if you have not already done so. Use the drop-down menus at the top of the workspace:

Deleting Files
You can delete a single file or multiple files.
Deleting a Single File
-
Navigate to the folder that contains the file you want to delete.
-
Click the delete icon.

-
Click Delete in the dialog that asks you to confirm the deletion.
-
The Console deletes the file.
You can also delete a file using the Origin Storage deleteFile API.
Deleting Multiple Files
-
Navigate to the folder that contains the files you want to delete.
-
Choose files you want to delete. You have two options:
- Individual: Select individual files by clicking the checkboxes to the left of the file names.
- All: To select all files currently visible in the files and folders list (based on the results per page setting), Click the checkbox to the left of the Delete button.
The button to delete files is inactive until you select one or more files. -
Click the Delete button.
-
Click Delete in the dialog that asks you to confirm.
Previewing Images
You can view image files that are in your Origin Storage account.
-
Navigate to the folder that contains the file.
-
Click the preview icon.

-
The image appears in a dialog along with its direct link.
Getting Direct Links to Files
The Console allows you to obtain a file’s URL that you can share by copying and pasting. The URL allows users to directly download the file from Origin Storage. For security purposes, the link is valid for 24 hours only.
-
Navigate to the folder that contains the file.
-
Click the generate link icon.

-
The direct link appears in a dialog box along with the link expiration date/time.
-
Click the copy to clipboard icon to get a link you can paste.

The Origin StorageAPI does not provide a means for obtaining a file’s URL.
Downloading Files
- Navigate to the folder that contains the file you want to download.
- Click the download icon.

Your browser downloads the file.
Uploading Files
You can upload by drag and drop or by selecting individual files. The Console fully supports file names with UTF-8 characters.
- The Console allows you to upload a zero-byte file and imposes no file size limits.
- The Console allows you to upload no more than 50 files at once. At any given time, the Console uploads only two files concurrently. The rest of the files are in an upload queue.
- If you attempt to upload a file in a directory that already contains the file name, the Console overwrites the existing file.
- There is no limit to the number of files that you can store in a directory, but the Console displays a maximum of 10,000, so anything over that limit will not visible within the Console.
Uploading by Drag and Drop
-
Navigate to the folder to which you want to upload files.
-
Select one or more files from your desktop and drag them over the Console. As you hover over the Console, you see the Drop files here prompt:

-
Release the files.
-
The Console uploads your files.
See also Viewing Upload Progress and Canceling Uploads.
Uploading Using the Upload Button
-
Navigate to the folder to which you want to upload files.
-
Click the upload button.

-
The Open dialog appears. Use the dialog to browse to the location of your files and select the desired files.
-
Click the Open button in the dialog.
-
The Console uploads your files.
See also Viewing Upload Progress and Canceling Uploads.
Viewing Upload Progress
During file upload, the Console displays the upload progress bar and the Cancel All icon:

Small files are generally uploaded very quickly and the progress bar goes away almost immediately.
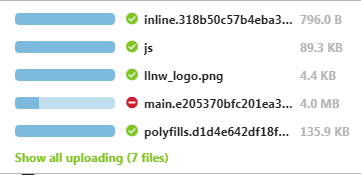
If you are uploading multiple files, you can click the upload progress bar to show upload details—the status of each file in the upload:

For uploads with more than five files, the upload details includes the Show all uploading link:

Click the link to view details for the remaining files.
Identifying Newly Uploaded Files
After the Console uploads a file, the Console flags the file with the New icon:

The file is placed at the start of the files and folders list.
If you don’t see your uploaded files in the files and folders list, the list might be set to show folders only. Click the show files and folders button or the show files only button (see Controlling List Content).
Canceling Uploads
You can cancel a single file upload or cancel all files in a multi-file upload by clicking the Cancel All icon:

You can also cancel individual files in a multi-file upload:
-
Click the upload progress bar to show progress details.

-
Click the Cancel icon for any individual uploads you want to stop.
Working with Folders
Before You Start
Select an account and user name if you have not already done so. Use the drop-down menus at the top of the workspace:

Creating Folders
- Navigate to the folder where you would like to create the new folder.
- Click the Add button.
- Enter a name in the CREATE dialog and click Create.
If you attempt to create a directory with a
- If the folder name before the slash exists, the Console creates a new directory in that folder.
- If the folder name before the slash does not exist, the Console displays an error informing you that the parent path does not exist.
For example, if you are in the root directory and a folder named test exists and from the root directory you click Create Folder and enter
/ slash in the name one of two things happens: - If the folder name before the slash exists, the Console creates a new directory in that folder.
- If the folder name before the slash does not exist, the Console displays an error informing you that the parent path does not exist.
For example, if you are in the root directory and a folder named test exists and from the root directory you click Create Folder and enter
test/sub-test, the Console creates the folder sub-test under /test.You can also create directories using the Origin Storage API. Use any of the following:
- makeDir
- makeDir2
- post/directory
- makeDir
- makeDir2
- post/directory
Uploading Folders
You can upload one or more folders by drag and drop.
- All files within the folder will be uploaded.
- You can upload multiple folders at the same time.
- You can upload a folder that has multiple levels of subfolders. All subfolders and their contents will be uploaded as long as the total number of files is less than a configured maximum number.
To upload folders:
-
Navigate to the folder to which you want to upload folder.
-
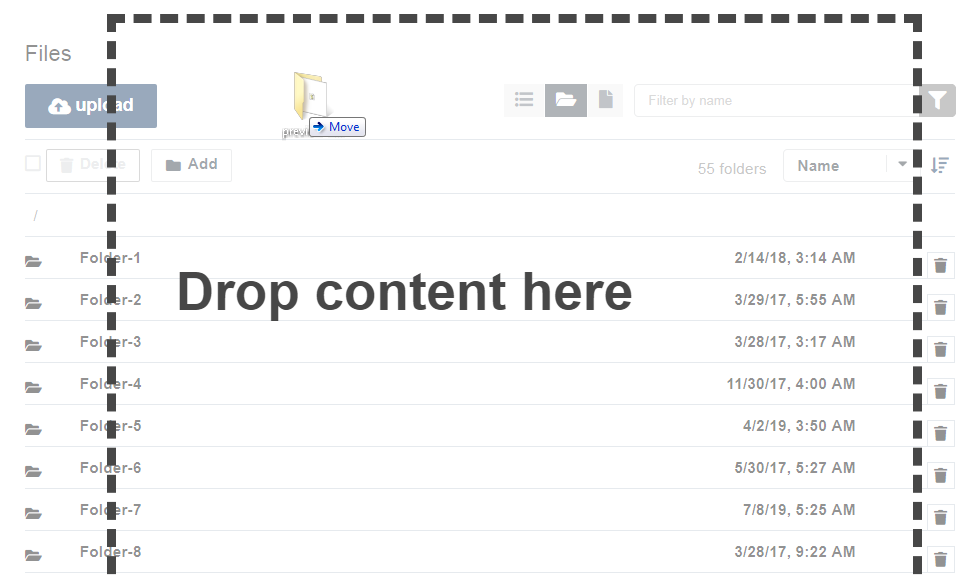
Select one or more folders from your desktop and drag them over the Console. As you hover over the Console, you see the Drop content here prompt:

-
Release the folders.
-
The Console uploads the folders.
Visibility of uploaded folders and files depends on the view in which you did the upload:
- ‘folders only’ - Uploaded folder(s) are visible but not the files within. You need to change to one of the other filter views.
- ‘files only’ - Uploaded folder(s) are not visible. You need to change to one of the other filter views.
- ‘files and folders’ - All uploaded folder(s) and the content within are visible if navigated to.
Deleting Folders
- You can only delete empty folders. To delete files in a folder, see Deleting Files.
- The Console does not support recursive deletes (deleting a folder’s subfolders, all their subfolders, and so on).
- You can also delete a folder using the Origin Storage deleteDir API.
- The Console does not support recursive deletes (deleting a folder’s subfolders, all their subfolders, and so on).
- You can also delete a folder using the Origin Storage deleteDir API.
Managing Accounts and Users
Logging Out
Click the Welcome link at the top right part of the Console and select Logout:
