Deploying your web application behind Edgio is the fastest and easiest way to start seeing the performance benefits made possible by the Edgio network. In this guide we’ll show you how to:
- Create a new Edgio project
- Configure edge caching using EdgeJS
- Deploy your site
If any point, you want a more detailed guide, we’ve got that too.
Example
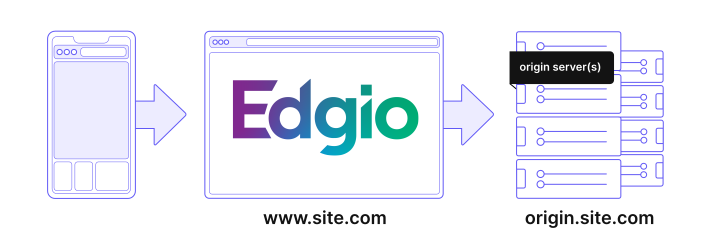
Network Diagram
As shown below, Edgio becomes the main CDN for your site:

Requests for your site will now pass through Edgio’s globally distributed edge network and then to your origin server.
A full production deployment requires changing your site’s DNS to allow requests to come to Edgio first. View our production guide for that process.
Prerequisites
Setup requires:
- An Edgio account. Sign up for free.
- An Edgio property. Learn how to create a property.
- Node.js. View supported versions and installation steps.
- Edgio CLI.
Install the Edgio CLI
If you have not already done so, install the Edgio CLI.
Bash
1npm i -g @layer0/cli@latest
Create your project
For creating a new site on Edgio, you can choose between:
- Edgio Developer Console - interactive UI for creating your site and deploy using generated command
- Edgio CLI - interactively initialize your project directly from the command line
Create via Edgio Developer Console
-
First, login to the Developer Console and locate the New Site button.

-
Next, enter your site’s domain name. This will eventually become the origin backend that you can proxy to once your site is setup.

An example command for www.yourdomain.com:
Bash
1npx @layer0/cli@latest init \2 --name yourdomain.com \3 --environment production \4 --origin www.yourdomain.com \5 --deploy
- Finally, you can start to update your Edgio router (
routes.js) and configuration file (layer0.config.js) to proxy your origin and setup caching rules.
Create via CLI
Now that the CLI has been installed, create a new project using:
Bash
10 init
Project Structure
After you run
0 init, Edgio creates the following files:routes.js: defines routes to be cached and prefetched, as well as what to pass through without modification and what to serve up as static contentlayer0.config.js: various configuration options to tune your project
Configure Backend to Proxy
To proxy your existing site with Edgio, we’ll need to define that backend in the
layer0.config.js file that was just created.JavaScript./layer0.config.js
1// This file was automatically added by layer0 deploy.2// You should commit this file to source control.3module.exports = {4 backends: {5 origin: {6 // The domain name or IP address of the origin server7 domainOrIp: "example.com",89 // When provided, the following value will be sent as the host header10 // when connecting to the origin. If omitted, the host header from11 // the browser will be forwarded to the origin.12 hostHeader: "example.com"13 },14 },15}
Configure Caching
We need to configure caching in our newly-created project. The project contains some generic starter routes already, but these should be customized to fit your site. These routes should be added in the
routes.js file.At this point, the only item that should require changing is a path match. We provide a basic sample to get you started.
Routes File
JavaScript./routes.js
1import { Router } from '@layer0/core/router'23// const ONE_HOUR = 60 * 604// const ONE_DAY = 24 * ONE_HOUR56export default new Router()7 // Here is an example where we cache api/* at the edge but prevent caching in the browser8 // .match('/api/:path*', ({ proxy, cache }) => {9 // cache({10 // edge: {11 // maxAgeSeconds: ONE_DAY,12 // staleWhileRevalidateSeconds: ONE_HOUR,13 // },14 // browser: {15 // maxAgeSeconds: 0,16 // serviceWorkerSeconds: ONE_DAY,17 // },18 // })19 // proxy('origin')20 // })2122 // send any unmatched request to origin23 .fallback(({ proxy }) => proxy('origin'))
This example will proxy and cache at the edge all requests that match the path pattern defined using
.match(...). The .fallback(...) handler takes all unmatched requests and also proxies them to origin, a backend that we just defined inside the layer0.config.js file.Cache Constants
Cache constants in the
routes.js have been abstracted out to enable reuse across different routes. You can also add additional constants such as year.JavaScript./routes.js
1import { Router } from '@layer0/core/router'23const ONE_HOUR = 60 * 604const ONE_DAY = 24 * ONE_HOUR5const ONE_YEAR = 365 * ONE_DAY6// ...
Learn advanced prefetching techniques to achieve the best possible performance.
Deploy to Edgio
Now that you’re satisfied with your site in local development, it’s time to deploy it to the Edgio Cloud. Once deployed, you can formally evaluate site performance and QA functionality.
Deploy your site with the following command:
Bash
10 deploy # Root of project
Once your project code is up and running, you can view its performance from within the app.layer0.co cockpit. Using the tools available here, you can understand the caching behavior of the routes you have added. Continue adding routes and dialing in your config until you are ready to launch the site and code.
Issues?
If you have any issues during this process, check our forums for assistance.
