Edgio makes it easy to conduct split testing without performance penalties by executing splits at the edge through an easy-to-use yet powerful interface. It can be used for A/B and multivariate tests, canary deploys, blue-green tests, iterative migration off of a legacy website, personalization, and more. This guide shows you how to configure a split test.
How Split Testing Works
You can perform two kinds of split tests with Edgio:
- A/B test multiple implementations of the same site (environment).
- Split traffic between multiple sites (environments) - This is commonly used to test a new experience against a legacy one.
The first option is configured in EdgeJS within the project, the second option is configured in the console application.
A/B Testing Multiple Implementations
To A/B test multiple implementations of the same site, simply deploy each implementation to a separate environment; then configure the rules for splitting traffic using the Edgio Developer Console.
To use Continuous Integration (CI) to deploy A/B tests we recommend that you:
- Set up separate branches in source control for the main experience and the new experience, for example
masterandpreview. - Create environments called
productionandpreviewin the Edgio Developer Console. - Configure CI to deploy the
masterbranch to theproductionenvironment and thepreviewbranch to thepreviewenvironment. (Using0 deploy --environment={environment name}).
Limitations
- Note that nested split testing is not supported. So for example, if you create a split test on environment A that sends a portion of traffic to environment B, any split testing configured on environment B will be ignored.
Splitting Traffic between Multiple Sites
To split traffic between multiple sites, first add a backend for each site to layer0.config.js. For example, to split traffic between a new experience hosted on
origin.my-site.com and a legacy experience hosted on legacy-origin.my-site.com:JavaScript
1// layer0.config.js2// New branch site backend3module.exports = {4 backends: {5 legacy: {6 domainOrIp: 'legacy-origin.my-site.com',7 },8 new: {9 domainOrIp: 'origin.my-site.com',10 },11 },12}
Then, add a
destination for each site to your router. For example,JavaScript
1// routes.js2const { Router } = require('@layer0/core/router')3module.exports = new Router()4 .destination(5 'legacy_experience', // displayed in the destination dropdown in the traffic splitting section of your environment configuration in the Edgio Developer Console6 new Router()7 // additional routing rules for the legacy experience go here8 .fallback(({ proxy }) => proxy('legacy')),9 )10 .destination(11 'new_experience', // displayed in the destination dropdown in the traffic splitting section of your environment configuration in the Edgio Developer Console12 new Router()13 // additional routing rules for the new experience go here14 .fallback(({ proxy }) => proxy('new')),15 )
Once you have made these changes, deploy your site using
0 deploy --environment={my production environment name}, then configure the rules for splitting traffic using the Edgio Developer Console.After deploying a router with multiple destinations, all requests will be sent to the first destination until you have configured the split test in the Edgio Developer Console.
Configuring the Split Test
Navigate to the environment in which you want to configure the split test and click Edit:

Scroll to the Split Testing section and click Add Rule:

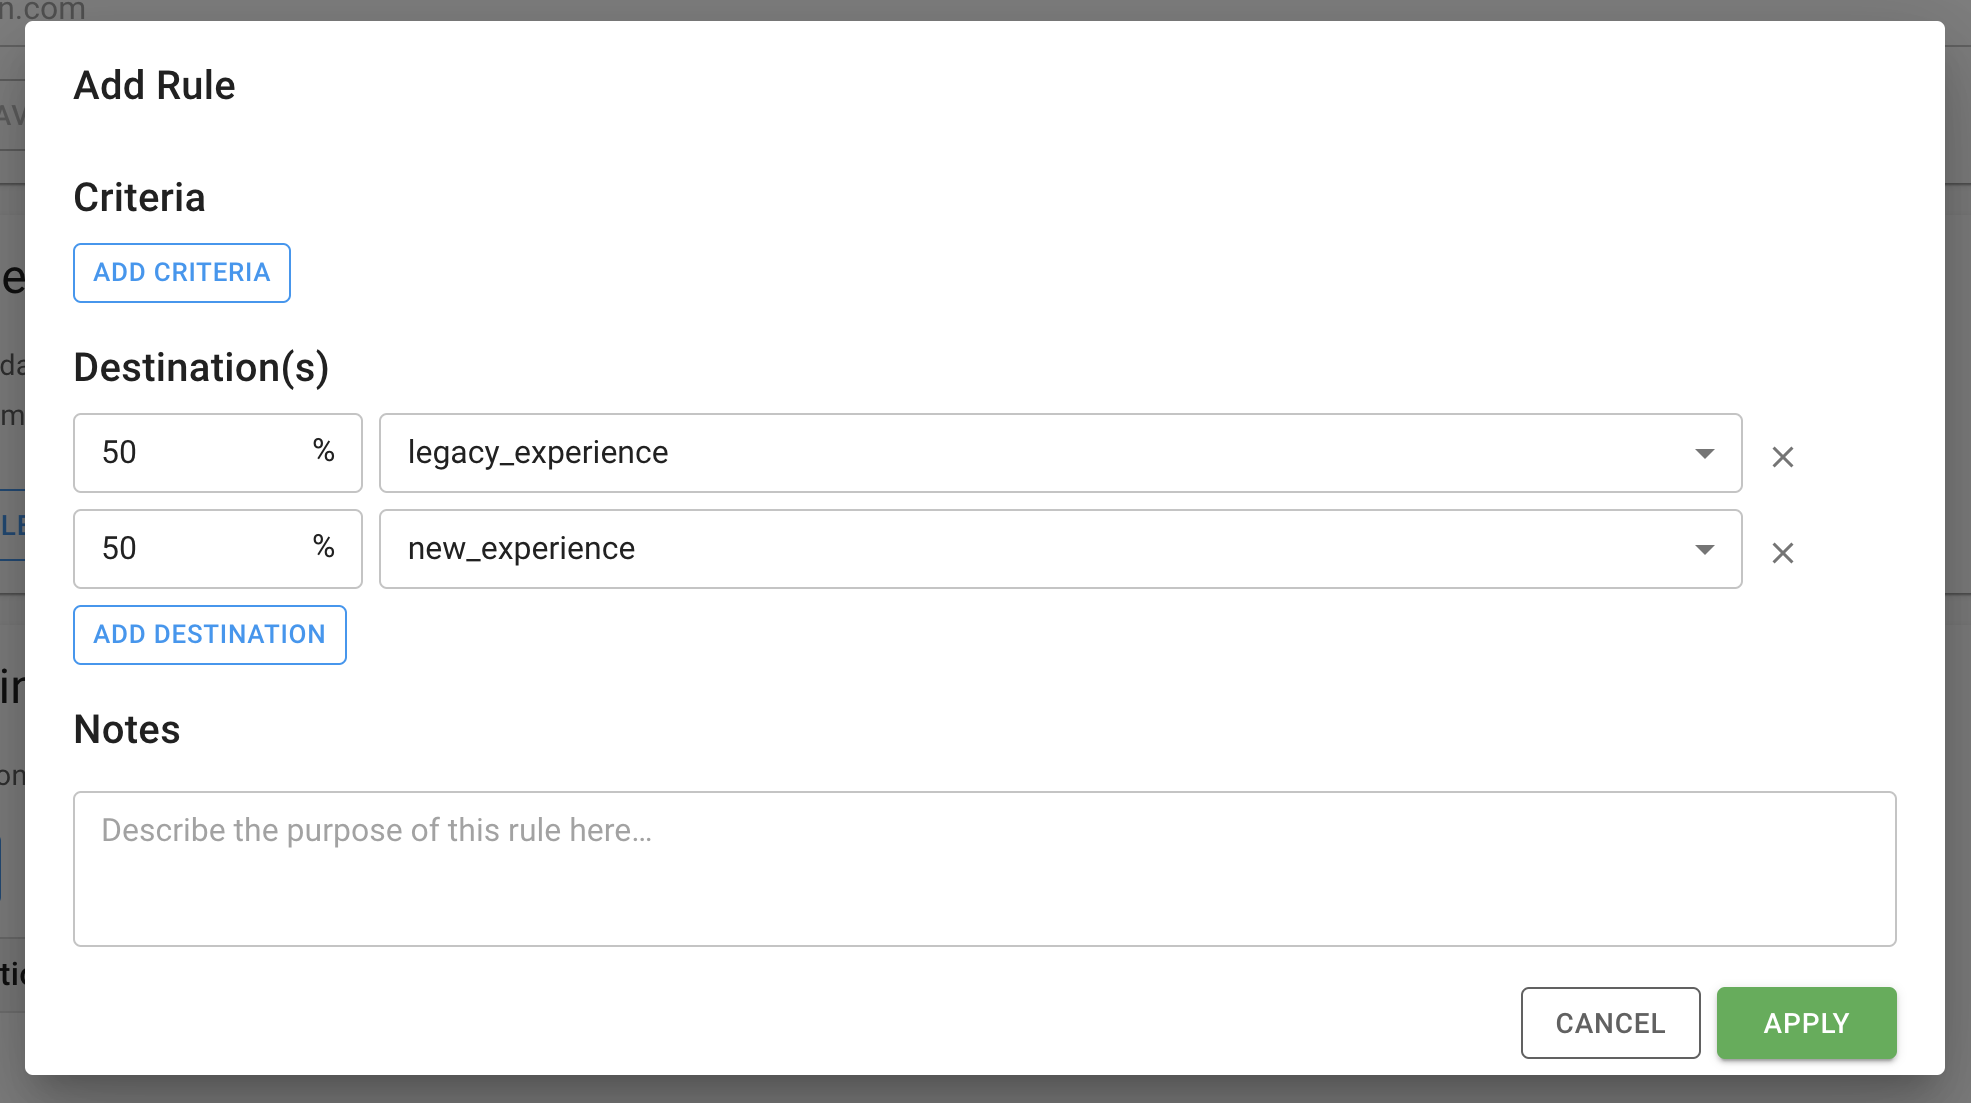
Select the amount of traffic to send to each destination or environment and click Apply.

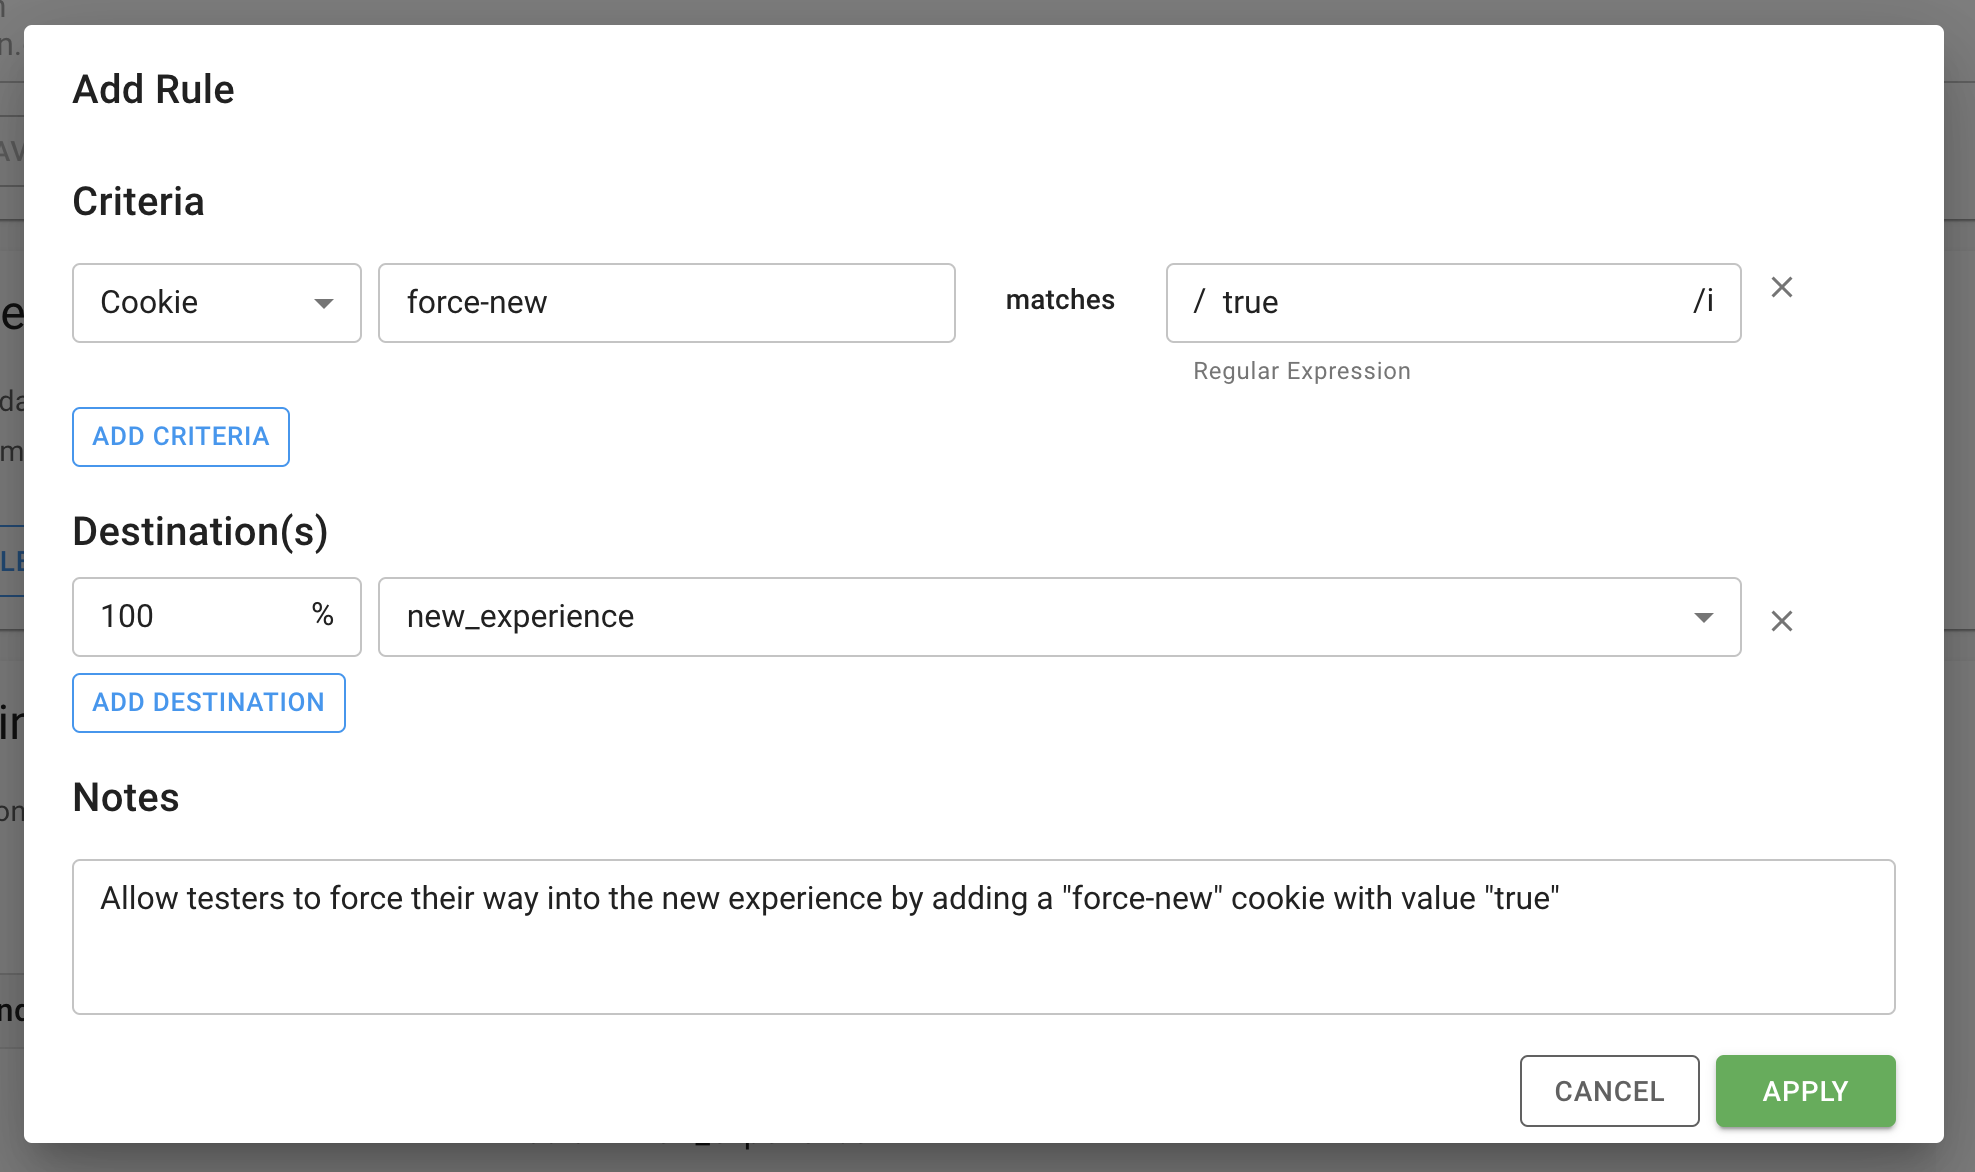
You can add additional rules to the traffic split as well. For example, you can allow testers to access a specific experience all of the time by setting a cookie value. In addition to cookie value, you can split traffic based on header value, path, IP address, URL parameters, device type, browser type, and bot boolean. Here’s an example:

The order of rules is critical. Rules are matched from top to bottom. When handling a request, the first matching rule will be used for the request. Given the rules set up in the examples above, you would need to move the
force-new cookie rule to the top so that it takes precedence over the other rule that splits all traffic without any criteria. We can reorder the rules by dragging and dropping:
To begin the split test, click the Activate button at the top of the environment:

Limitations
Nesting
Split testing cannot be nested behind other split testing. Requests are processed through two phases, edge security, redirects and split testing, and then the EdgeJS configuration. When using split testing, the first phase is executed once in the site (environment) which receives the request, and then control is delegated to the second phase of the correct cohort configuration.
Versioning
Split testing across vastly different versions of Edgio may lead to unexpected results, and it is strongly recommended to keep similar versions. Split testing from v4 to v3, or even between v4.5 and v4.0 may introduce subtle bugs due to evolving features across versions. Within one major version things should work reliably.
Ending the Split Test
To end the split test, you can either deploy a new version of your app with the router destinations removed, or update the environment to send 100% of traffic to a specific destination.
Third-Party CDNs
If Edgio is behind a third-party CDN, it is critical that you update the third party CDN to not cache responses from Edgio nor to affect any cookies that begin with
layer0_. You can find more details here.How Requests are Routed
When a split test is active, all users are assigned to a random number between 1 and 100 via a cookie called
layer0_bucket. This cookie assignment is done at the edge before the user’s first request hits the cache, so there is no performance penalty for new users.The experience the user sees is determined by the traffic split percentage you set in the environment configuration in the Edgio Developer Console and on which side of the split the user’s
layer0_bucket value falls.Identifying the Experience on the Client
When a split test is active, Edgio will automatically set a
layer0_destination cookie to the name of the chosen destination. You can access this value in the browser and use it to report the split test experience assignment to your analytics. This cookie is present in both the inter- and intra-site (environment) configurations.Cache Key
The default cache key includes the
layer0_destination cookie. As such, you do not need to define additional headers to further the cache key. Each destination is cached independently and as long as someone doesn’t manually change their cookies, they will be served cached content from the correct bucket.Security, Redirects and Split Tests
Each environment defines security rules, redirect rules, and split test rules. When traffic is processed by the Edgio servers, the
host header is used to determine which environment rules are executed. Normally when you have multiple environments you access each of them using different host headers. E.g. www.mysite.com to access a production environment and new.mysite.com to access the new environment. In this scenario each environment can have its own security rules and redirect rules. Requests arriving at www.mysite.com execute the rules in the production environment. Requests arriving at new.mysite.com execute the rules in the new environment.But when split testing is enabled, all the traffic arrives using the same
host header. In this case, only the rules for that environment are executed. Using the above example, when a split test is setup on the production environment that splits traffic to production or new all traffic arriving at www.mysite.com executes the production security, redirect, and split testing rules. Even if the result of the split test is to use the new environment, the security, redirect, and split testing rules of the new environment are not executed. Traffic arriving at new.mysite.com bypasses the split test rules on the production environment, so it executes the new environment’s rules normally.Metrics and Cache Purging with Split Tests
When split tests are enabled, all metrics and caching are recorded under the environment that is the result of the split test. Using the above example, all traffic arrives on
www.mysite.com but to see the traffic and caching metrics for requests split test to the new environment, you need to view those graphs in new environment in Edgio Developer Console. This is also true for cache purging. To purge traffic that was split to the new environment you use the cache purge button in the new environment in Edgio Developer Console. If want to purge the entire cache during a split you need to purge both the production cache and the new cache.Compatibility with A/B Testing Tools
Edgio split testing routes traffic at the edge based on a variety of criteria. It does not identify user cohorts (although it can split on cohorts identified by another tool) or report business metrics about A/B tests since there are many great tools for that. We recommend you utilize an A/B testing tool that supports server-side integration such as Monetate, Optimizely, Adobe Test, Google Experiments, or Visual Web Optimizer. These tools will set a cookie or header that can be used to split traffic using the appropriate criteria described above.
Analytics Integration
In order to analyze the results of your A/B test, you will need to alter your analytics code to report the currently live segment for an action, session, and/or page view that you are interested in tracking. The exact integration steps depend on your analytics package and are beyond the scope of this document. However some key considerations to keep in mind for your implementation:
In some Edgio implementations where there is a mix between “legacy” and modern PWA pages, these legacy pages may incorrectly overwrite tracking of the entire session as legacy, when it should be recorded as a PWA session. One example of this may be an ecommerce site, the path to product (homepage, category page, and product page) may be a PWA, but the checkout is powered by the legacy site. Make sure you test flows where the user migrates between “legacy” and PWA pages to make sure that your analytics software is recording these pages correctly.
Note that you will also have to carefully consider when you record which experience the user is in and how you report it to your analytics. For these reasons we highly recommend thorough testing of analytics in an A/B test.
Example
This example Next.js application showcases how you can use Google Analytics to track the current segment by referencing the
layer0_destination cookie.Open the link using incognito/private browsing session to observe varying cookie values.
This example site has a configured split test in the Edgio Developer Console to split 50% of desktop traffic between the
default (production) and the split_test environments.
Caveats
Based on the above example of an ecommerce PWA, if a shopper adds something to the cart and then you change the traffic percentage before they return to checkout, the transaction could get credited to the wrong experience. The correct experience to credit in this scenario depends on your test and the metrics you are measuring. For example, consider a shopper who is on variant A when they add something to the cart, and then return later to checkout and are assigned variant B. If your A/B test involved a change to “path to product” (i.e. home, category, or product pages) then you should credit the transaction to variant A. However if the A/B test involved a change to the checkout you should credit the transaction to variant B.
Be sure you understand the scope and behavior of the variables you are using to track the A or B variant in your analytics package. For example, in Google Analytics, a custom variable can be applied using “hit”, “session”, or “user level” scope. In the preceding example of the shopper adding something to the cart, you would likely want to use a “session” scoped variable. However, there are scenarios where a “hit” scope variable may be more appropriate.
While other methods are possible, our recommendation is that implementers should use the
layer0_destination cookie when determining which segment the user is in for the purposes of analytics.