Content reprocessing allows you to insert ad breaks to an existing Uplynk asset. Specifically, open an asset; create, read, update, and delete ad breaks; and save as a new asset.
Content added to the library is known as an asset.
Reprocessing assets re-encodes the modified segments and may result in additional encoding costs.
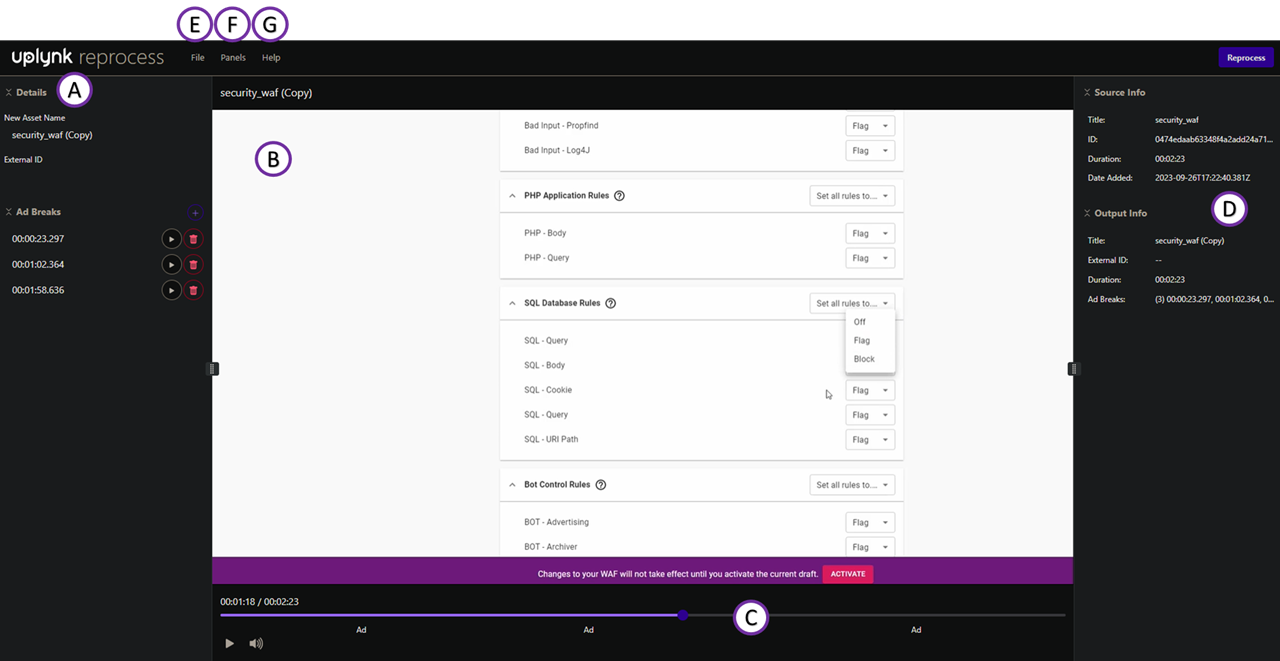
The reprocessing screen is comprised of these panels and sections:

| Section | Feature | Details |
|---|---|---|
| A | Details | Modify reprocessed asset’s name, ID, and ad breaks. |
| B | Player | Play back video with ad breaks. |
| C | Seek Bar | View ad breaks in blue. Click on the seek bar then + Ad Break to use that timestamp for a new ad break. |
| D | Source/Output Info | Captures the title, ID, duration, ad-break timestamps, and date of the original asset, as well as the title, ID, duration and ad-break timestamps of the reprocessed asset. |
| E | Files | Manage reprocessing files: Open: Open a different file. Reprocess: Reprocess the original asset and create a new one with the desired changes. Reset All Changes: Revert all changes and return the asset to its original state. |
| F | Panels | Select the panels to view/hide. |
| G | Help | Learn Shortcut Keys: View a list of available keyboard shortcuts. Documentation: Link to relevant content. |
Choose an Asset
- Locate the Asset: Find the asset you want to reprocess. Refer to Content Management for information on the CMS and Search features.
- Create a Copy: Click Reprocess in the top-right corner to create a copy.
- Rename the Content: In the Details section, enter a new name in the New Asset Name field.
- Optional: Choose an External ID if applicable.
Insert New Ad Break
- Optional: Identify a specific point in time for the new ad break by clicking the desired location in the seek bar at the bottom of the player.
- Add New Ad Break:
- In the Ad Breaks section, click the + button to insert a new ad.
- Enter the timestamp for the new ad break.
- Click Insert to create the new ad break marker.
- Save Changes: Click Reprocess in the top-right corner to save your changes.
Modify/Delete Existing Ad Break
- View/Modify Existing Ad Breaks:
- Go to the Ad Breaks section.
- Click the Play button next to existing ad breaks to jump to that point in time in the video.
- To modify, enter a new timestamp value for the ad break.
- Delete an Ad Break: Click the trashcan icon next to an ad break to remove it.