

RTLD may automatically deliver compressed log data to Splunk Enterprise by submitting HTTPS
POST requests to it. The Splunk HTTP Event Collector (HEC) will collect and log each request. Each request contains a compressed JSON document that describes one or more log entries.The format for log data delivered to Splunk Enterprise is JSON Lines. This log format does not provide information that uniquely identifies a set of log data. As a result, there is no way to check for gaps in sequence numbers when attempting to identify missing log data.
Key information:
-
The prerequisite for log delivery are:
- Splunk Enterprise 7.x
- Your instance of Splunk Enterprise 7.x must be secured with SSL.
- SSL must be enabled on the HTTP Event Collector.
For information on how to set up Splunk Enterprise, please refer to their documentation. -
The set of available log fields varies by RTLD module: RTLD CDN | RTLD WAF | RTLD Rate Limiting | RTLD Bot | RTLD Cloud Functions
To set up Splunk Enterprise log delivery
-
Set up Splunk Enterprise’s HTTP Event Collector to accept CDN log data in JSON format.
-
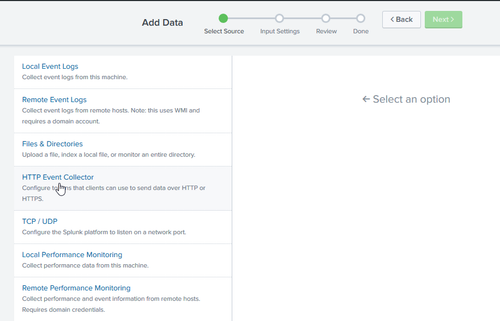
From with Splunk Enterprise, click Settings and then Add Data.

-
Click Monitor.

-
Click HTTP Event Collector.
-
In the Name option, define a name for the CDN log data that will be collected.

-
Click Next >.
-
Click Select to display the Select Source Type option. Click that option, type
\_jsonto filter source types, and then select it.
-
Click Review.
-
Click Submit > to finish setting up the HTTP Event Collector. An HEC token will be generated. Use this token to authorize requests posted to the HEC.
-
-
Perform the following steps if you have hosted Splunk Enterprise within your network:
-
Configure your firewall to allow
POSTrequests from this IP block:198.7.21.0/24 -
Set up support for the HTTPS protocol.Log delivery requires a certificate whose trust anchor is a publicly trusted certificate authority (CA). Additionally, the certificate must include a chain of trust for all intermediate certificate(s) and a leaf certificate.
-
-
Upon completing the above steps, you should create a log delivery profile for Splunk Enterprise.


To set up a log delivery profile
-
From the Real-Time Log Delivery page, click + New Log Delivery Profile and then select the desired type of log field.
-
Open the desired property.
- Select either your private space or a team space.
- Click on the desired property.
-
From the left pane, click on the desired environment.
-
From the left pane, click Realtime Log Delivery.
-
Click + New Log Delivery Profile and then select either CDN, WAF, Rate Limiting, Bot, or Cloud Functions.
-
-
From the Profile Name option, assign a name to this log delivery profile.
-
From the Log Delivery Method option, select
Splunk Enterprise. -
Define how RTLD will communicate with Splunk Enterprise.
-
Set the Splunk URL option to a URL that points to your Splunk Enterprise’s HTTP Event Collector configuration.Default URL syntax:
https://<SPLUNK ENTERPRISE HOSTNAME>:<PORT>/services/collector/rawReplace<SPLUNK ENTERPRISE HOSTNAME>with the hostname where your instance of Splunk Enterprise is hosted. Replace<PORT>with the port number (e.g.,8088) that the HTTP Event Collector is listening for data. This port number may be configured when defining your HEC’s global settings. -
Set the HEC Token option to the token generated for your HTTP Event Collector configuration.
-
-
From the Log Format option, select whether to format log data using our standard JSON format, as a JSON array, as JSON lines, or as a CSV (RTLD CDN only).Learn more about these formats: RTLD CDN | RTLD WAF | RTLD Rate Limiting | RTLD Bot | RTLD Cloud Functions
-
From the Downsample the Logs option, determine whether to reduce the amount of log data that will be delivered. For example, you may choose to only deliver 1% of your log data.
-
All Log Data: Verify that the Downsample the Logs option is cleared.
-
Downsampled Log Data: Downsample logs to 0.1%, 1%, 25%, 50%, or 75% of total log data by marking the Downsample the Logs option and then selecting the desired rate from the Downsampling Rate option.Use this capability to reduce the amount of data that needs to be processed or stored within your web server(s).RTLD CDN Only: Downsampling log data also reduces usage charges for this service.
-
-
Determine whether log data will be filtered.
-
By default, all log fields are enabled on a new log delivery profile. From within the Fields section, clear each field for which log data should not be reported.
-
Log fields are categorized. You may add or remove individual fields by expanding a category and then marking or clearing specific log fields. Alternatively, add or remove all of the log fields associated with a category by marking or clearing the desired category.
-
RTLD CDN Only: You may also log request headers, response headers, and cookies.
-
View log field definitions: RTLD CDN | RTLD WAF | RTLD Rate Limiting | RTLD Bot | RTLD Cloud Functions
-
-
Click Create Log Delivery Profile.